Solving the Issue of Connection Refused Error on Your Device – A Visual Guide
Troubleshooting Guide: USB Reconnection Issues Solved

If you have something important to do with the USB device connected to your Windows computer, but youkeep getting the error saying USB device not recognized . This could be super frustrating. But you’re certainly not the only one. Luckily, you can remove the error message through the following solutions. Read on and see how.
Try these fixes
Here are a few easy-to-apply methods that have helped other users resolve theUSB device not recognized keeps popping up problem. You may not have to try them all; just work your way down the list until you find the one that works for you.
- Re-connect your USB device directly to your computer
- Run the Hardware and Devices troubleshooter
- Uninstall all your USB controller drivers
- Update your USB device and motherboard chipset drivers
- Disable the USB selective suspend feature
- Adjust your system settings
Method 1: Connect your USB device directly to your computer
If your USB device connected to your computer is misconfigured, the USB device not recognized error may keep popping up. The following simple steps could help you fix it:
- Unplug your USB device out of your computer.
- Restart your computer.
- Once your computer reboots into the Windows system, re-connect your USB device to your computerdirectly throughthe built-in USB port , that’s to say, pleasedon’t use a USB hub to connect your USB device to your computer.
Check if the error disappears. If you don’t see the error pop up anymore, great! But if the error keeps still, proceed to try the following solutions…
Method 2: Run the built-in Hardware and Devices troubleshooter
Thebuilt-in Hardware and Devices troubleshooter can help you fix problems with devices connected to your computer. Run it to try to solve your USB device not recognized problem.
Here’s how you can do it:
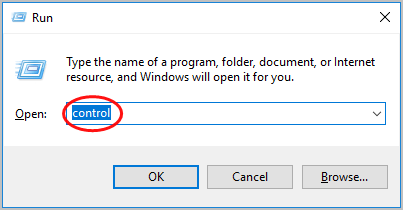
- On your keyboard, hold down theWindows logo key , then pressR to bring up theRun box.
- Typecontrol and pressEnter .

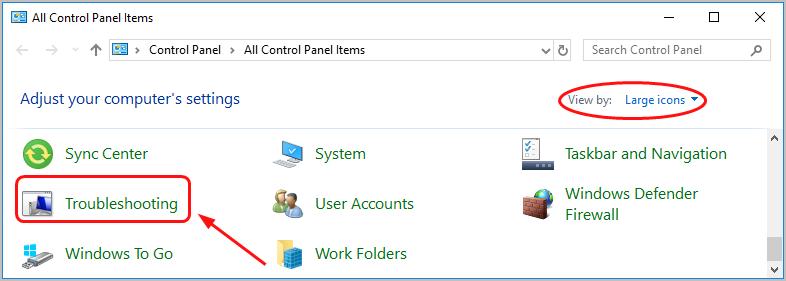
- ClickTroubleshooting whenView by Large icons are selected.
- Select Configure a device under theHardware and sound section.
- ClickNext .
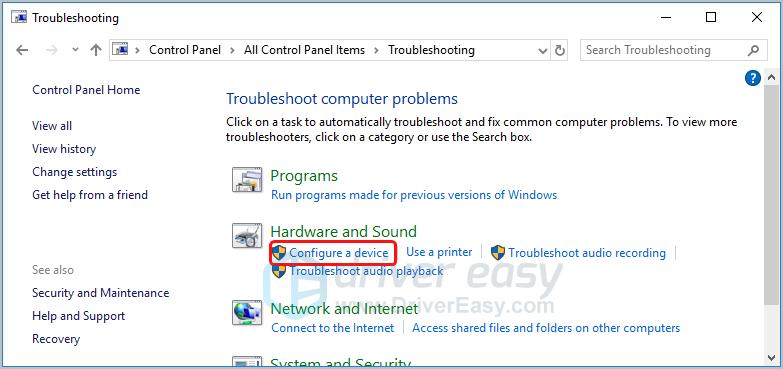
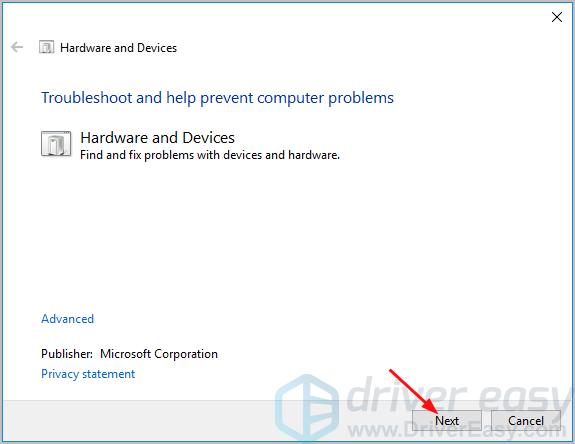
The troubleshooter would then be running automatically to detect and repair problems.
If you get rid of the error after running the troubleshooter, great! But if you’re prompted by the error again, don’t worry, you have something else to try…
Method 3: Uninstall and reinstall all your USB controller drivers
This problem could be also caused by yourmisconfigured USB controller drivers , uninstalling and reinstalling them could fix it.
See how to do it:
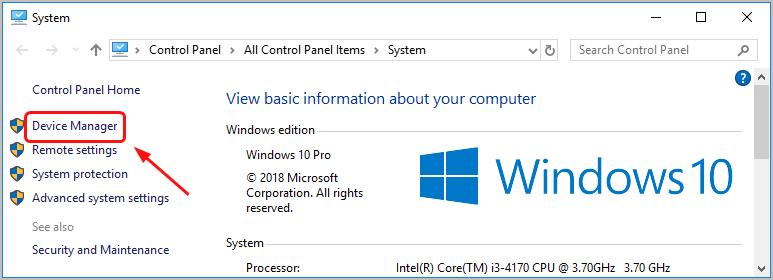
- On your keyboard, hold down theWindows logo key , then pressPause .
- ClickDevice Manager .
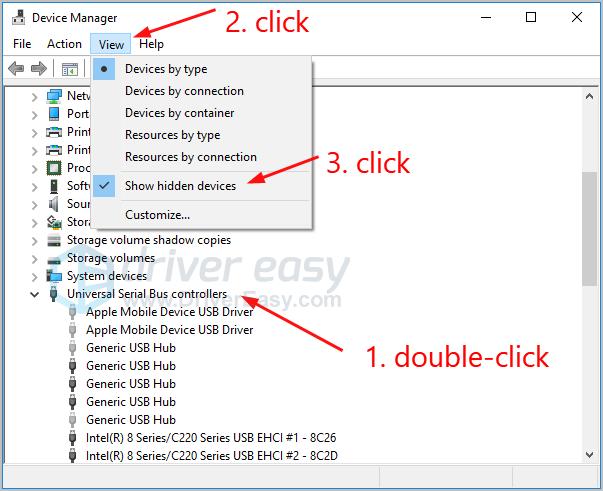
- Double-clickUniversal Serial Bus controllers . Proceed to clickView , then selectShow hidden devices .
- Right-click on your first USB controller driver under the Universal Serial Bus controllers section to selectUninstall device .
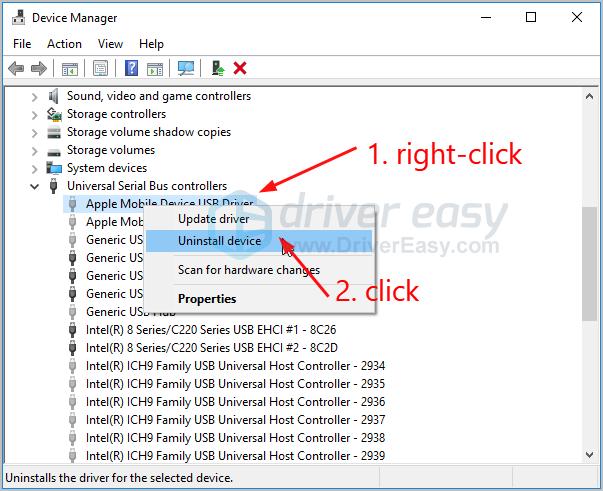
5. Repeat the step 4 for all yourother USB controllers drivers .
Once you uninstall all your USB controller drivers,restart your computer to let Windows reinstall the USB controller drivers automatically. Then check if the error still pops up.
Method 4: Update your USB device and motherboard chipset drivers
If yourUSB device andmotherboard chipset drivers are outdated or corrupted, you might also keep getting the error. We highly recommend you update your USB device driver (if your USB device has the driver) and motherboard chipset driver to make your USB device work well.
There aretwo ways you can get the right driver for your USB device and motherboard chipset: manually or automatically.
Manual driver update – You can update your USB device and motherboard chipset drivers manually by going to themanufacturer’s website for both your USB device and motherboard and searching for the most recent correct drivers for them. Be sure to choose the only driver that is compatible with your variant of Windows system.
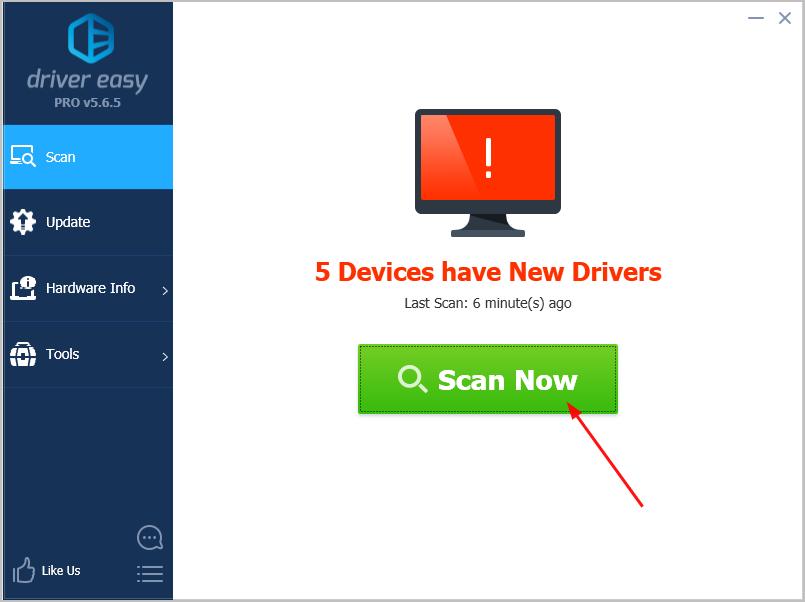
Automatic driver update – If you don’t have the time, patience or computer skills to update your USB device and motherboard chipset drivers manually, you can, instead,do it automatically with Driver Easy . Driver Easy will automatically recognize your system and find the correct driver for your devices, and your variant of Windows system, and it will download and install them correctly:
- Download and install Driver Easy.
- Run Driver Easy and click theScan Now button. Driver Easy will then scan your computer and detect any problem drivers.
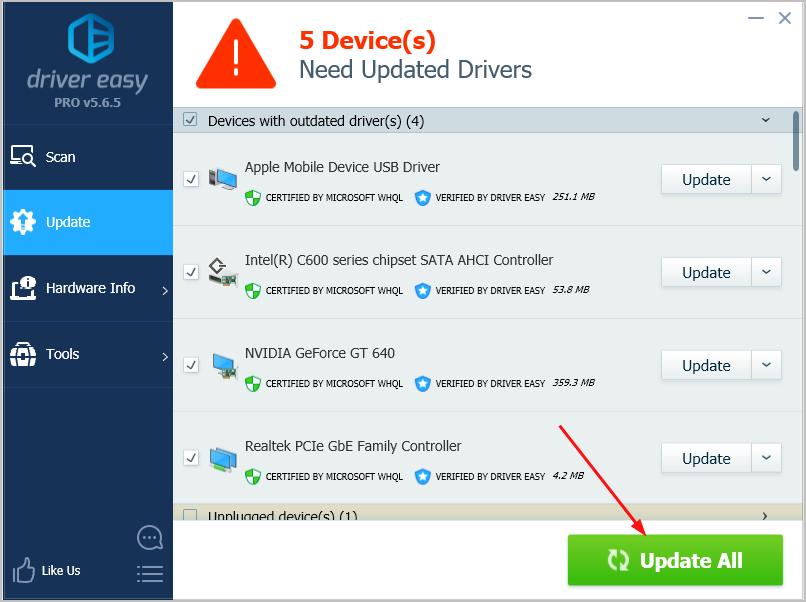
- ClickUpdate All to automatically download and install the correct version of all the drivers that are missing or out of date on your system. (This requires the Pro version which comes withfull support and a30-day money back guarantee. You’ll be prompted to upgrade when you click Update All.)
Note: You can do itfor free if you like, but it’s partly manual.
Restart your computer to see if the error disappears.
Method 5: Disable the USB selective suspend feature
TheUSB selective suspend feature helps conserve battery power which is useful in portable computers. But with it enabled, some problems sometimes might occur including your USB device not recognized problem. So disable the feature to try to solve your problem.
Here’s how you candisable the USB selective suspend feature :
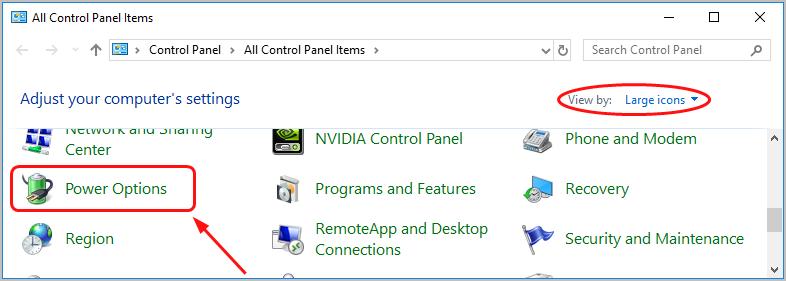
- On your keyboard, press theWindows logo key , then pressR to bring up the Run box.
- Typecontrol and pressEnter .
- ClickPower Options whenView by Large icons are selected.
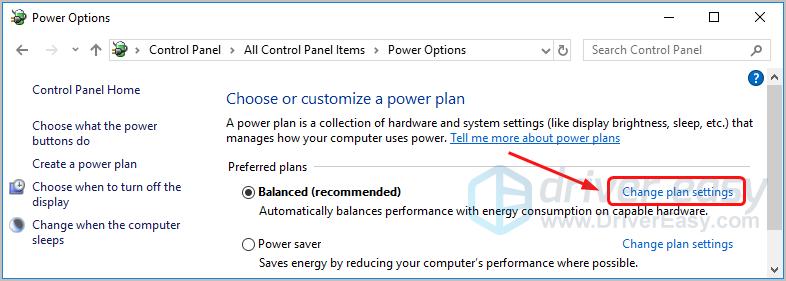
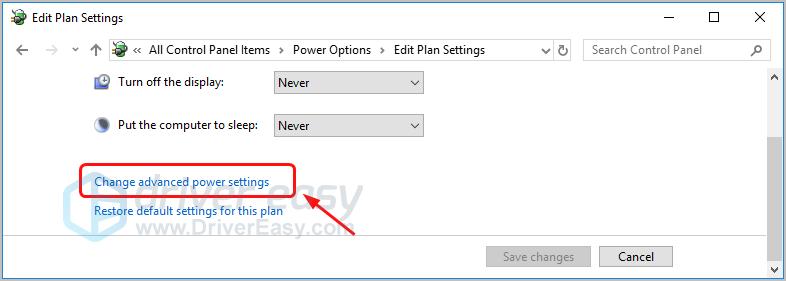
- Select Change plan settings ofBalanced(recommended) .
- ClickChange advanced power settings .
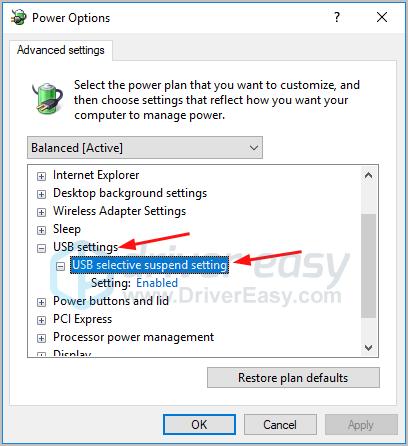
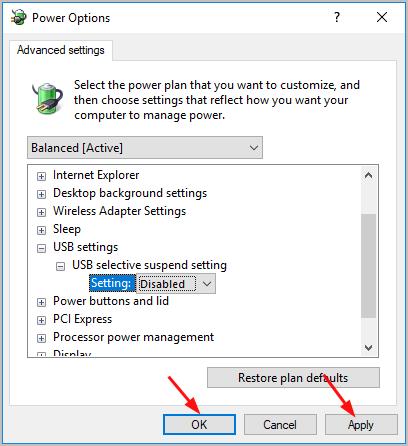
- Double-clickUSB settings >USB selective suspend setting .
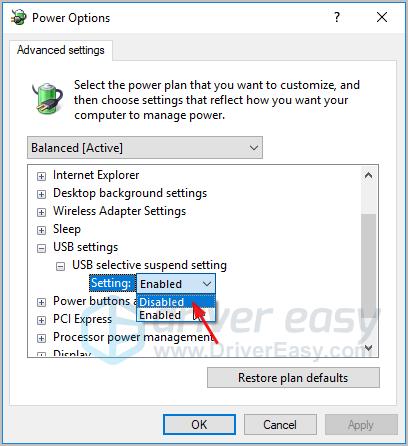
- ClickEnabled , then selectDisabled from the drop-down menu.
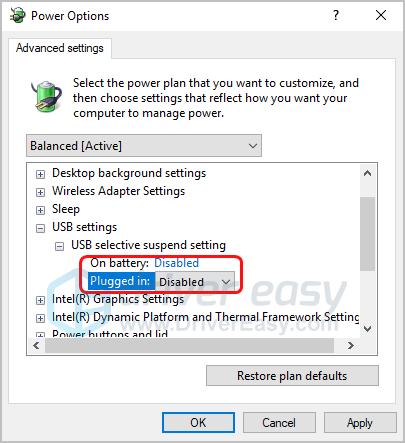
Note: If you’re on a laptop, there might be two Enable options to change,On battery andPlugged in .
Be sure toset both to Disabled . - ClickApply >OK to save your settings.
Check if the error disappears.
If till now, you don’t see the error message, congratulations! But if you’ve tried all the solutions above, you still see the annoying message, but your USB device works well, don’t give up hope, move on to the last solution here.
Method 6: Adjust your system settings
If your USB deviceworks great without any problem , but the USB device not recognized message still keeps popping up, you can try adjusting your system settings.
See how to do it:
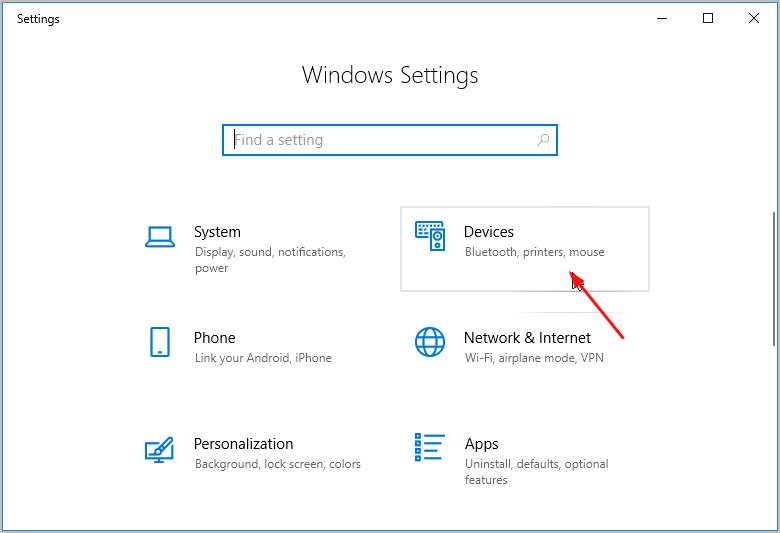
If you’re using Windows 10:
- On your keyboard, hold down the Windows logo key , then press I to bring up the Settings window.
- Click Devices .
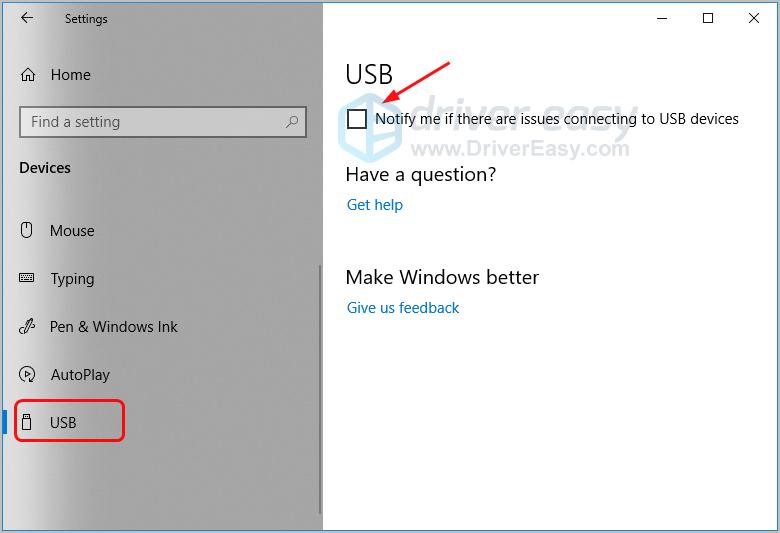
- Select USB, then un-check Notify me if there are issues connecting to USB devices.
If you’re using Windows 7:
- On your keyboard, press theWindows logo key , then pressPause .
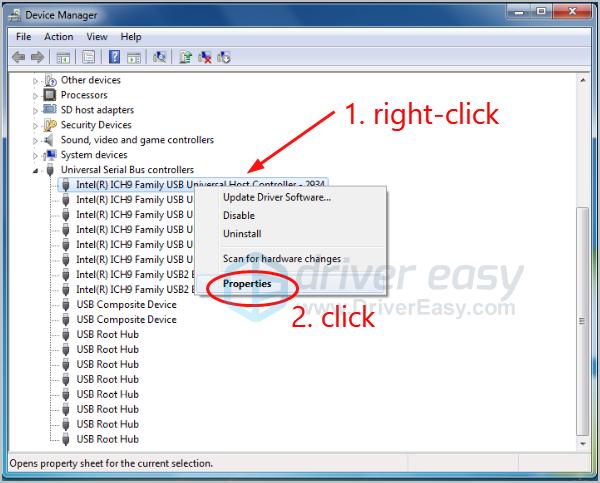
- ClickDevice Manager .
- Double-clickUniversal Serial Bus Controllers .
- Right-click on your first USB controller driver to selectProperties .
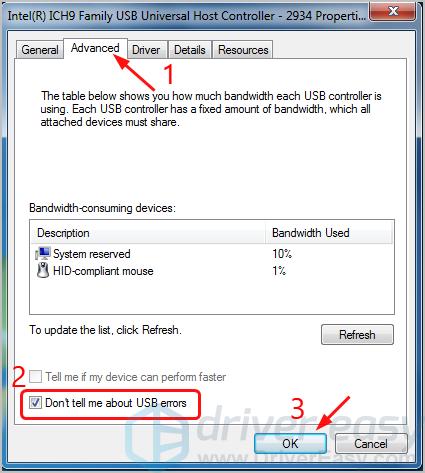
- Click Advanced , then tick on Don’t tell me about USB errors . ClickOK .
- Repeat Steps 4 & 5 for all your other USB controller drivers.
The USB device not recognized error message will not be shown any longer on your system.
That’s all there is to it. Hopefully it helps. Feel free to comment below with your own experiences.
Also read:
- [New] Channel Boost Achieve YouTube Affiliate Milestone with 10K Vistas
- Bypass Compatibility Issues to Enjoy Fortnite Even With Unsupported GPUs on PC
- Control Xbox One Through Voice Commands
- Ctrl+Alt+Del Not Responding? Here's What You Need to Know to Fix It!
- Eradicate Display Dilemmas: A Guide to Overcoming Window Flicker Issues
- Exploring the Best Multiplatform Editor: Why GIMP Stands Out as a Leading Free Option
- Fixing the Persistent Windows Update Halted at 0% Easily and Fast
- How To Remove or Bypass Knox Enrollment Service On Oppo Find X6
- In 2024, Say Goodbye to Bloatware with These 44 Superb Android Video Reducers
- Make Calling a Breeze: Utilizing the Intel Unison App on W11 Devices
- Overcoming 'Game Cannot Load': Restore and Fix the Absent physxloader.dll File
- Raising Digital Natives: Comprehensive Advice on Managing Kids' Interaction with ChatGPT
- Resolved: Trouble Encountered During Steam Game Update Process
- Title: Solving the Issue of Connection Refused Error on Your Device – A Visual Guide
- Author: Anthony
- Created at : 2025-02-03 18:38:02
- Updated at : 2025-02-06 23:04:19
- Link: https://win-howtos.techidaily.com/solving-the-issue-of-connection-refused-error-on-your-device-a-visual-guide/
- License: This work is licensed under CC BY-NC-SA 4.0.