
Microsoft Print to PDF Problems Solved for Windows 10 and 11 Users
Fixing the ‘Print to PDF’ Feature for Windows Users of Both Windows 10 & 11 - Solutions Uncovered
Print to PDF is an amazing feature built in Windows. Users can print their files, like JPG, Word file, as a PDF file. Such a helpful tool! However, many users had complained that Microsoft Print to PDF not working on their Windows.
Luckily, we’ve got the answer to it. Here in this article, we will be showing you the top effective solutions to solve the problem. Please go on with the easy steps with the images below, you should get your print-to-PDF work again then.
Disclaimer: This post includes affiliate links
If you click on a link and make a purchase, I may receive a commission at no extra cost to you.
Try these fixes
- Turn off Microsoft Print to PDF feature and turn it on again
- Enable there are no comma in the file name you enter
- Set Microsoft Print to PDF as default printer
- Remove & restore Microsoft Print to PDF and reinstall its driver
Solution 1: Turn off Microsoft Print to PDF feature and turn it on again
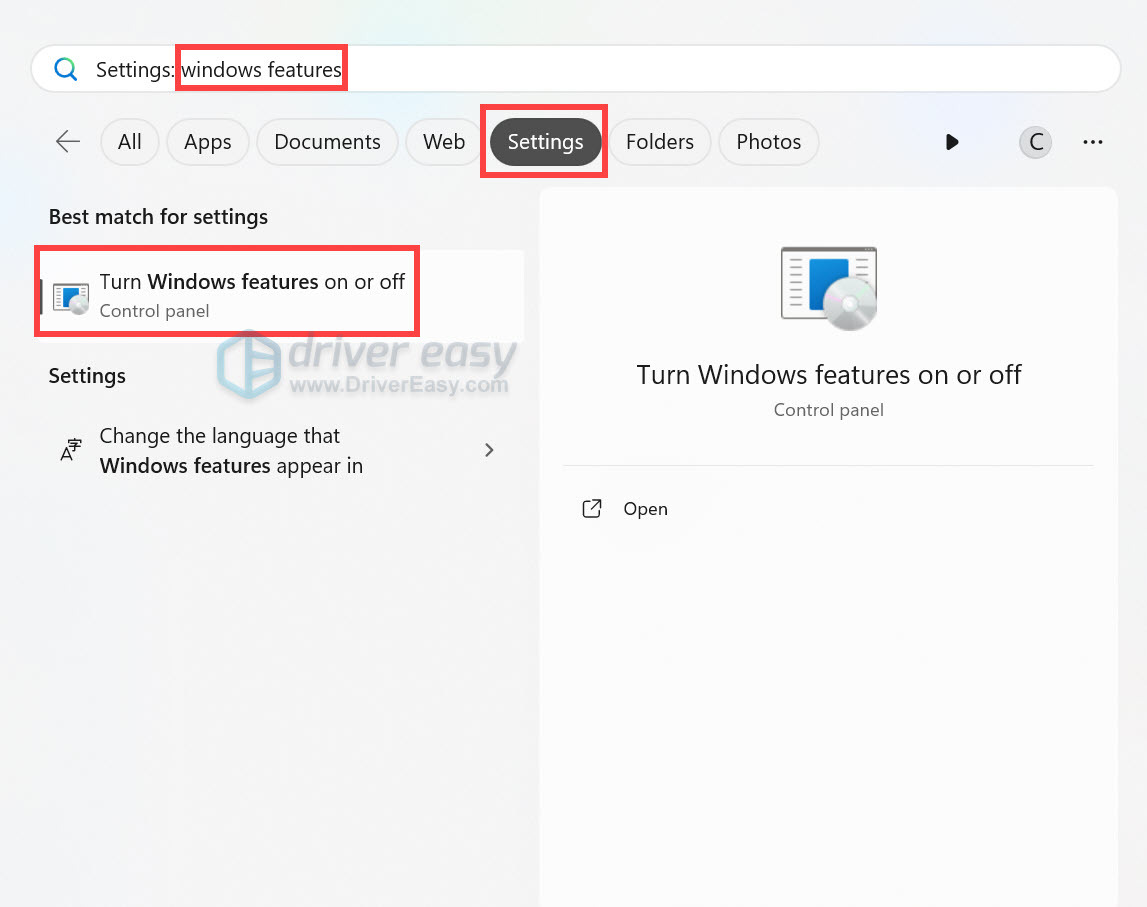
- Type windows feature in the search box from the Start menu, select theSettings tab. Then click Turn Windows features on or off from the top result.

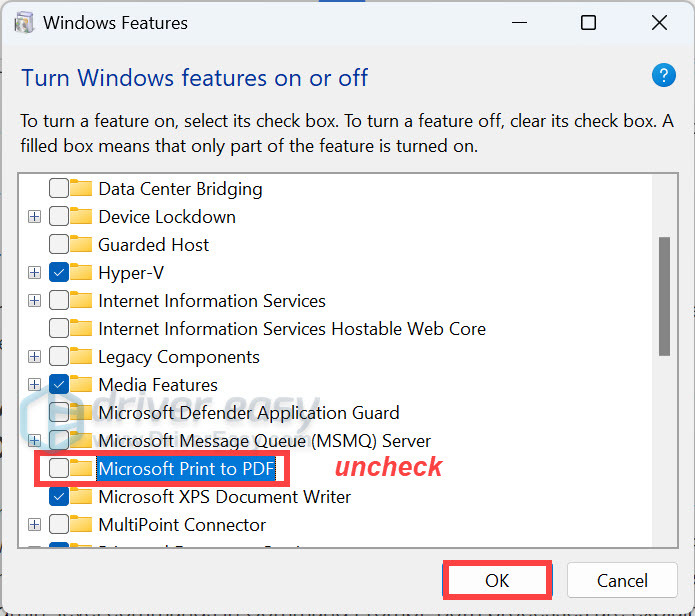
- Scroll down on the pop-up Windows features window. Find and uncheck the box of Microsoft Print to PDF . Then click OK to save settings.
Reboot your Windows.
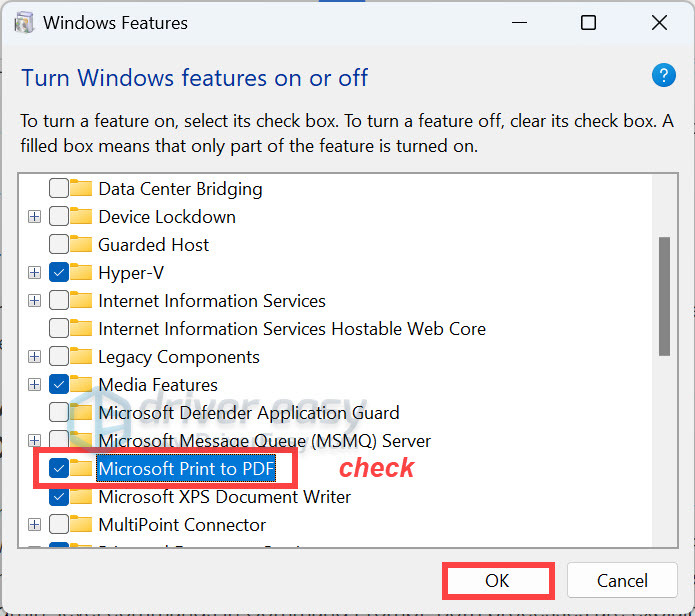
Follow step 1) again to open Windows features window. This time find and check the box Microsoft Print to PDF to enable it. Then click OK to save changes.
Now your print to PDF should work properly.
Solution 2: Enable there are no comma in the file name you enter
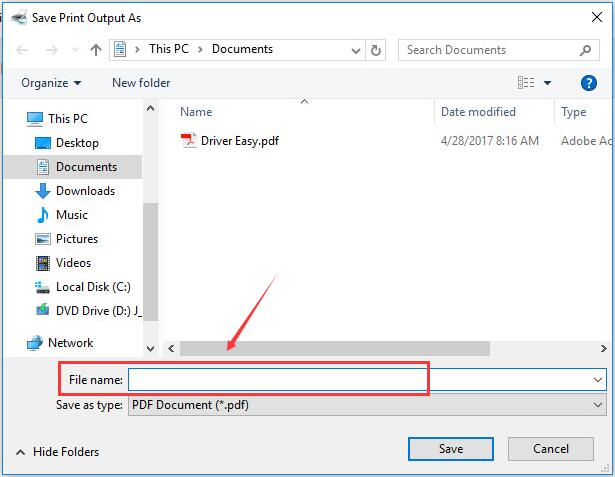
If the file name of PDF you want to save contain commas, the file would be created with 0 bytes and you cannot find it at saving folder. As a result, it seems your Microsoft Print to PDF not working. In such case, please avoid use comma or any other specific notations in the file name.
Solution 3: Set Microsoft Print to PDF as default printer
Windows 10 users
Windows 11 users
in Windows 10
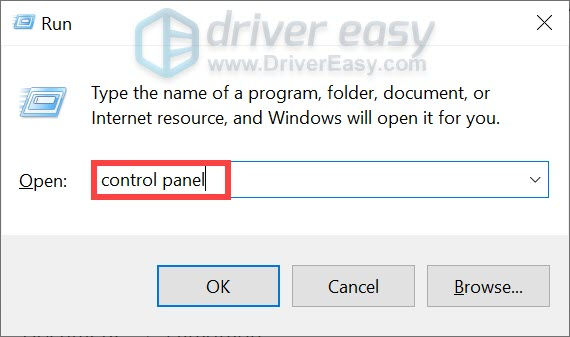
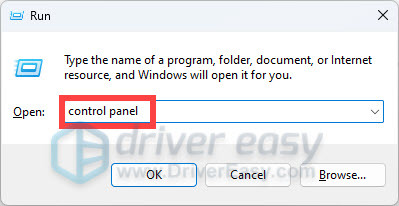
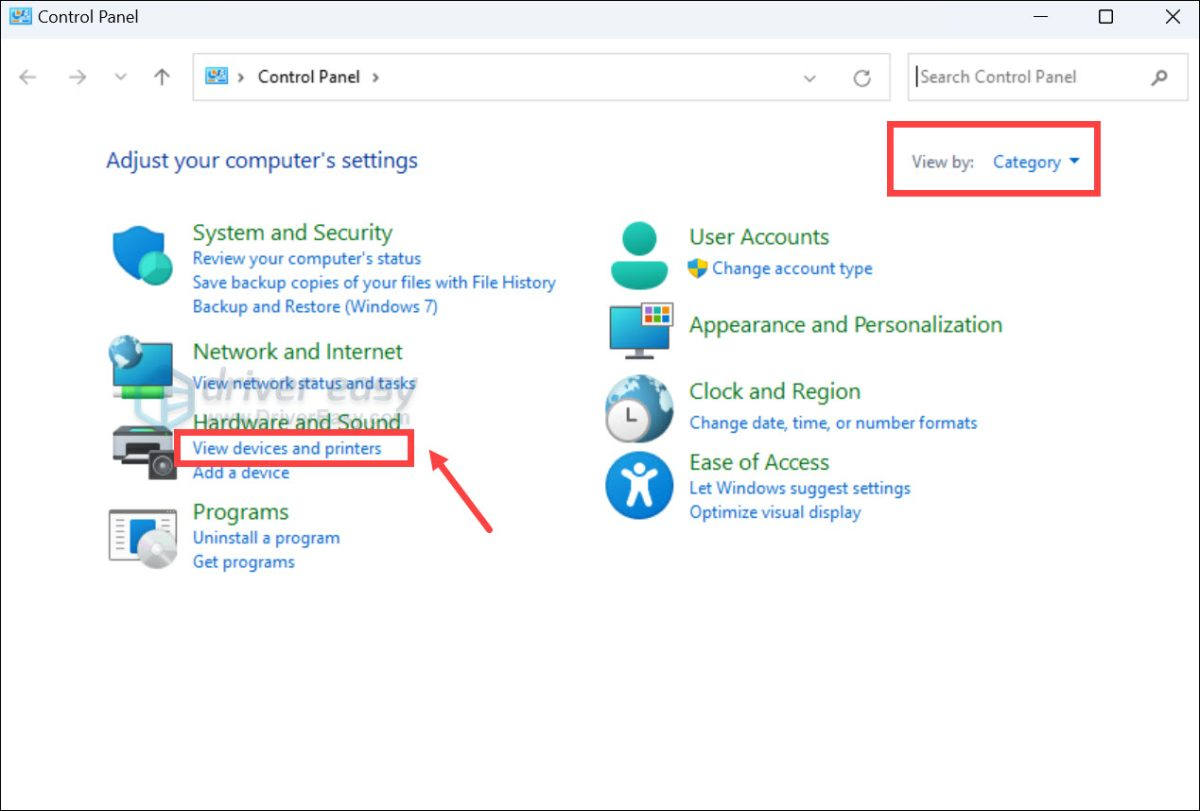
- On your keyboard, press theWindows logo + R keys simultaneously to open the Run box. Type control panel and hit Enter.
- Make sure you setCategory as your view-by. Then findView devices and printers . Click on it.
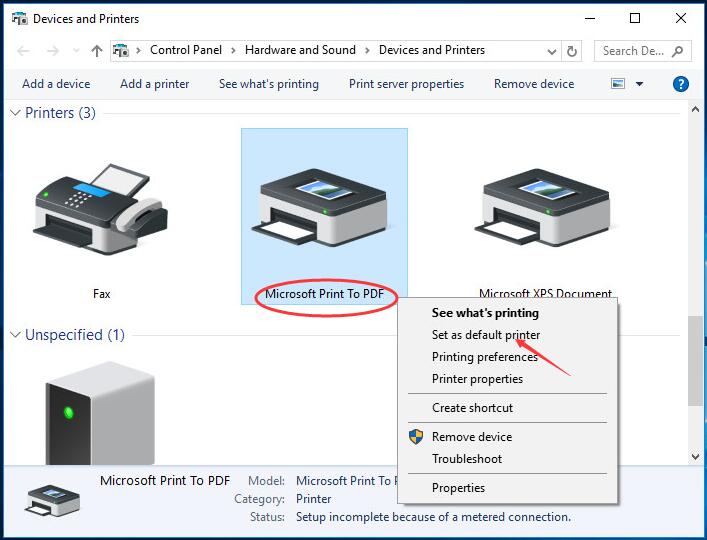
3)Find and right-click on Microsoft Print to PDF under Printers dialog on Devices and Printers window. Then click Set as default printer .
in Windows 11
- On your keyboard, press theWindows logo + R keys simultaneously to open the Run box. Typecontrol panel and hit Enter.
- Make sure you setCategory as your view-by. Then findView devices and printers . Click on it.
- Scroll down and clickPrinters & scanners .
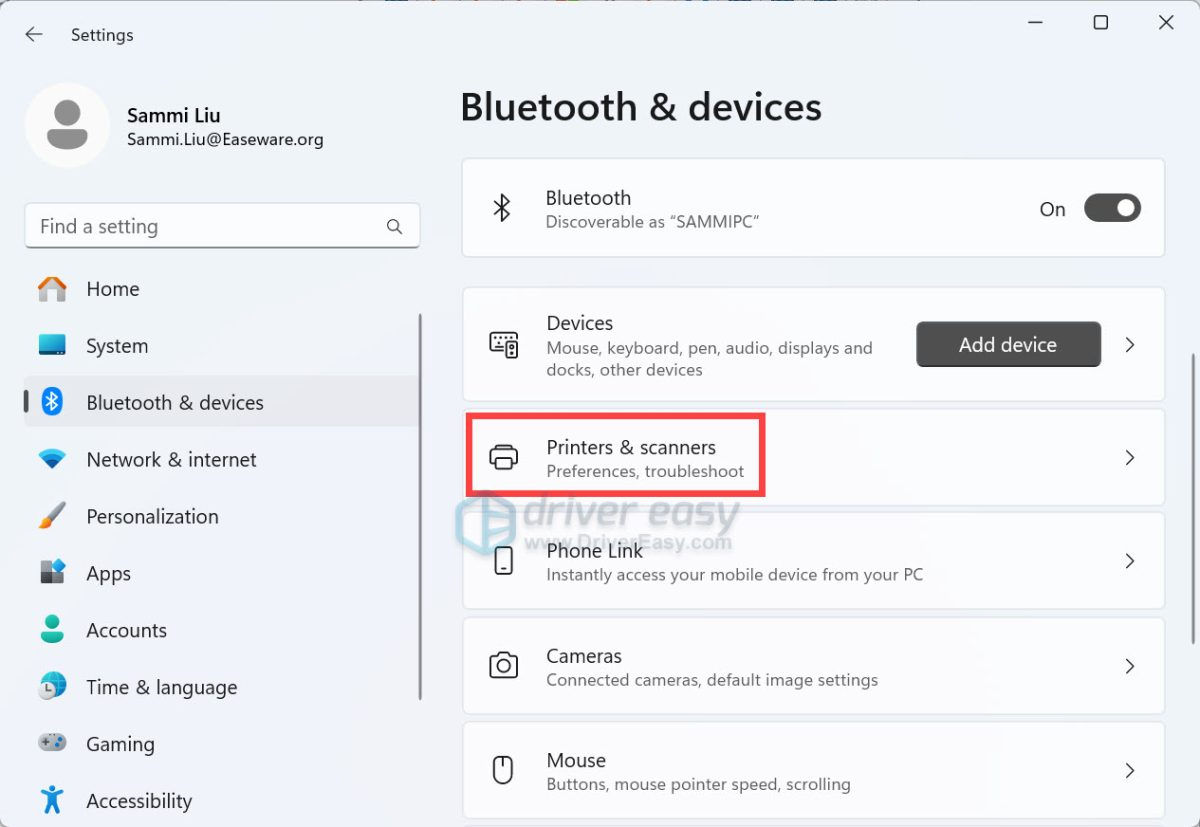
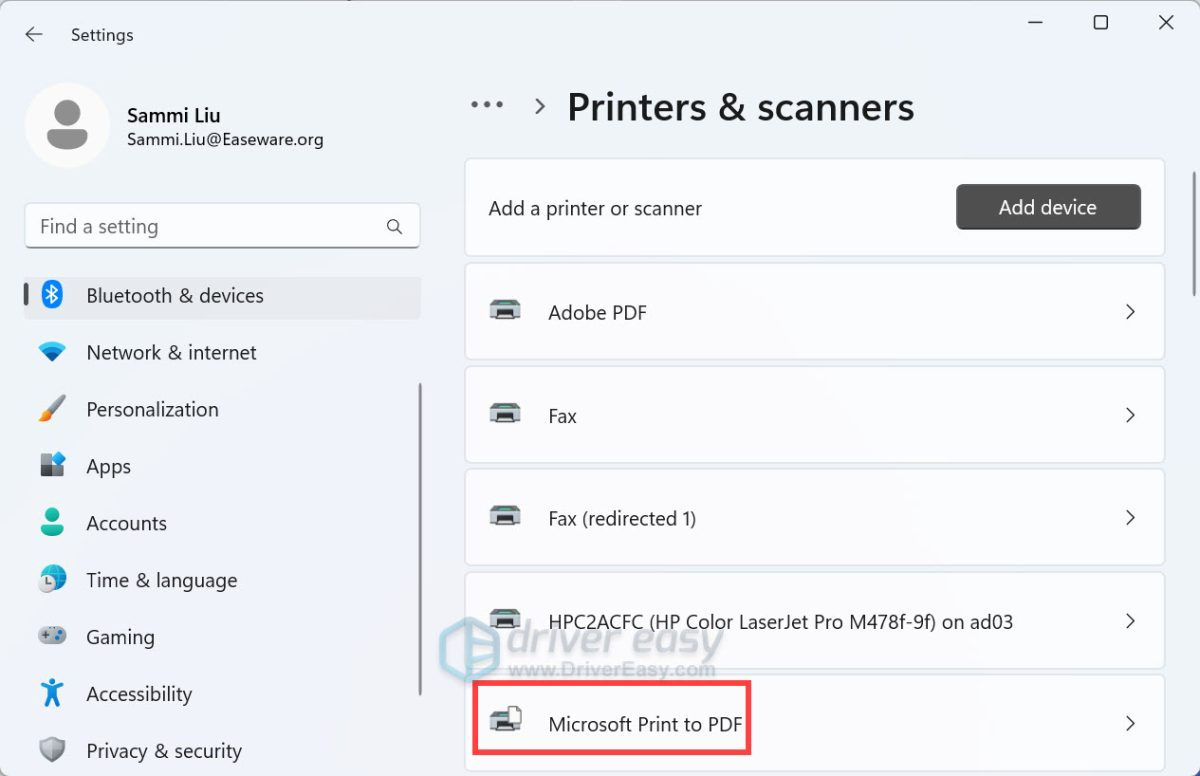
- FindMicrosoft Print to PDF and click on it.
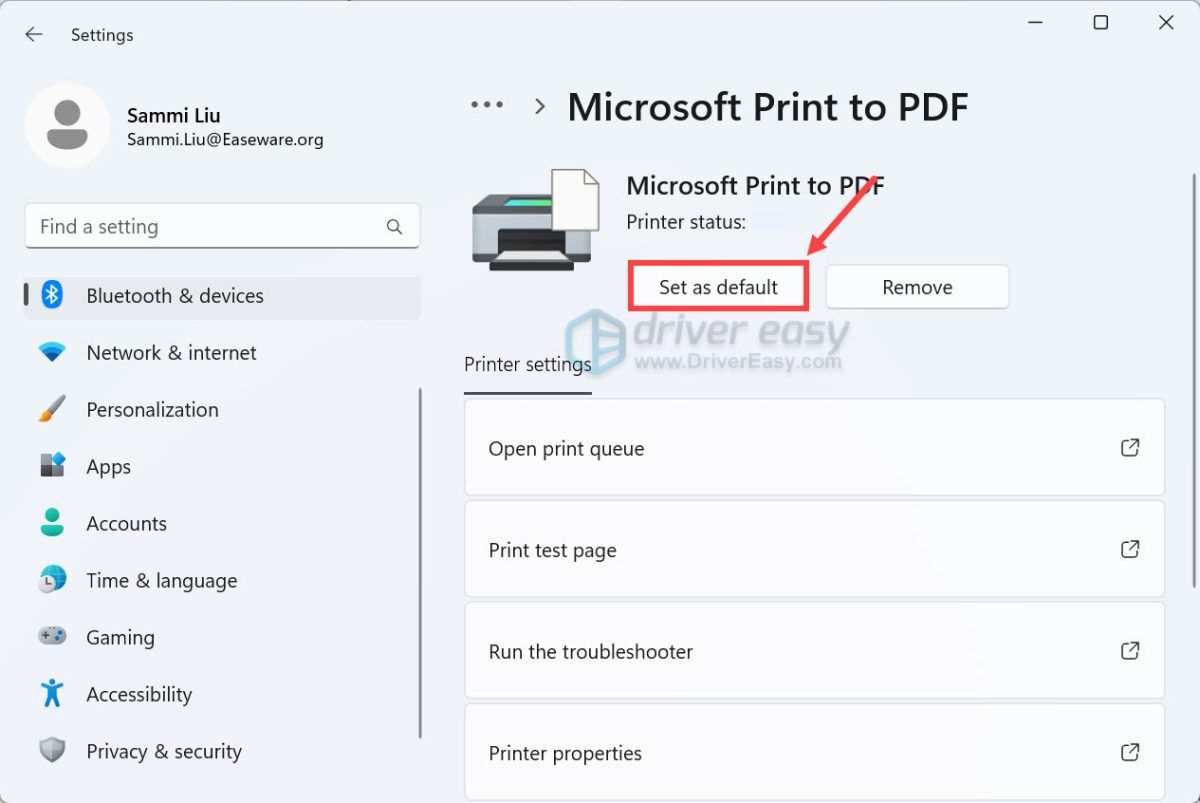
- Click on the buttonSet as default .
Solution 4: Remove Microsoft Print to PDF and reinstall its driver
Windows 10 users
Windows 11 users
in Windows 10
- On your keyboard, press the Windows logo + R keys simultaneously to open the Run box. Type control panel and hit Enter.
Make sure you set Category as your view-by. Then find View devices and printers . Click on it.
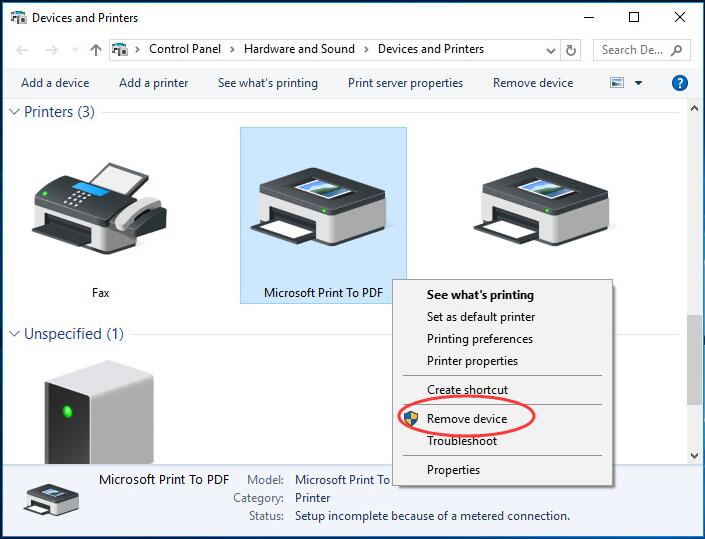
Find and right-click on Microsoft Print to PDF under Printers dialog. Then click Remove device . Click Yes when asked to confirm.
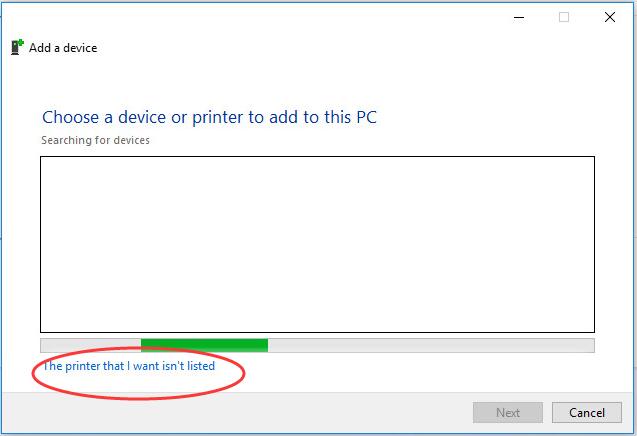
- Right-click on the blank area on Devices and Printers window to choose Add devices and printers .

- Click The printer that I want isn’t listed .
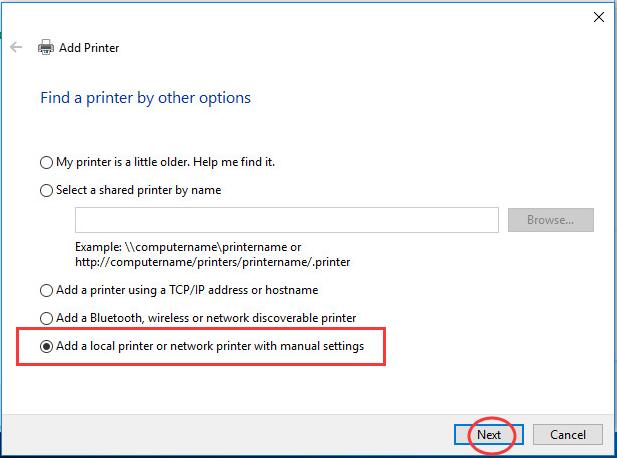
- Tick on Add a local printer or network printer with manual settings . Then click Next .
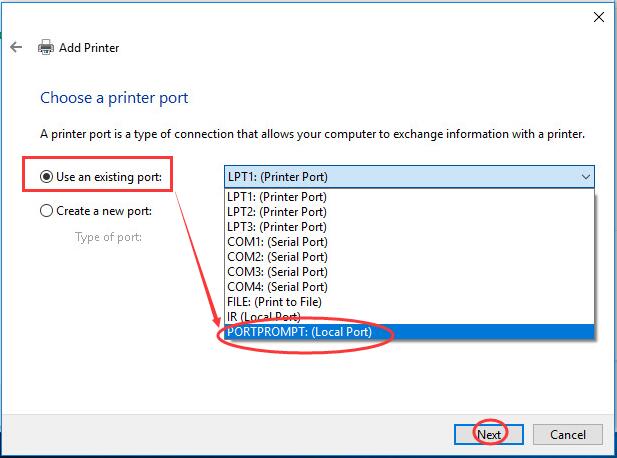
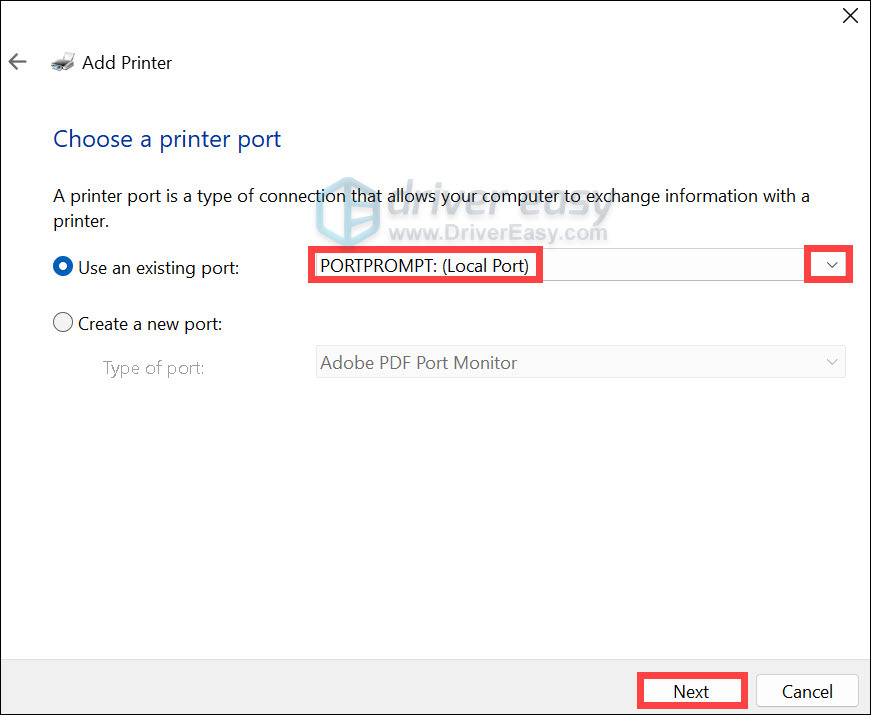
- ChoosePORTPROMPT: (Local Port) from the drop-down list under Use an existing port. Then click Next .
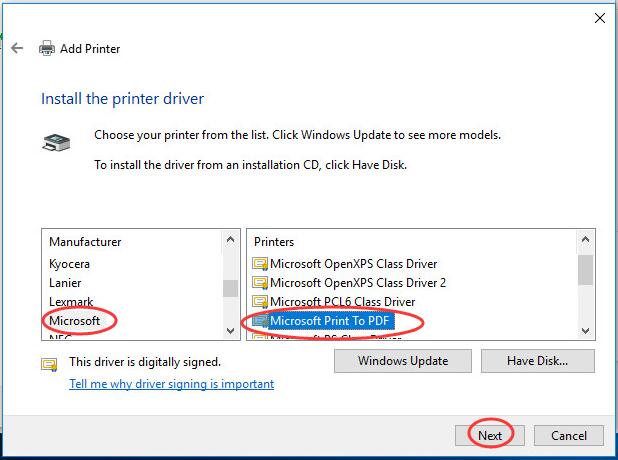
- Set Manufacturer Microsoft and Printers be Microsoft Print to PDF . Click Next to go on.
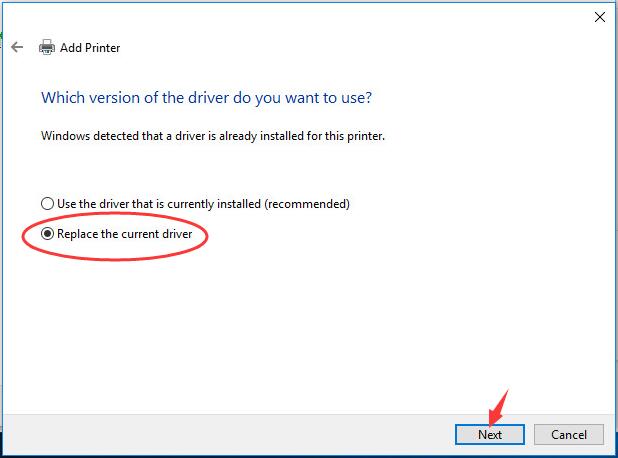
- Tick on Replace the current driver . Then click Next .
- Click Next .
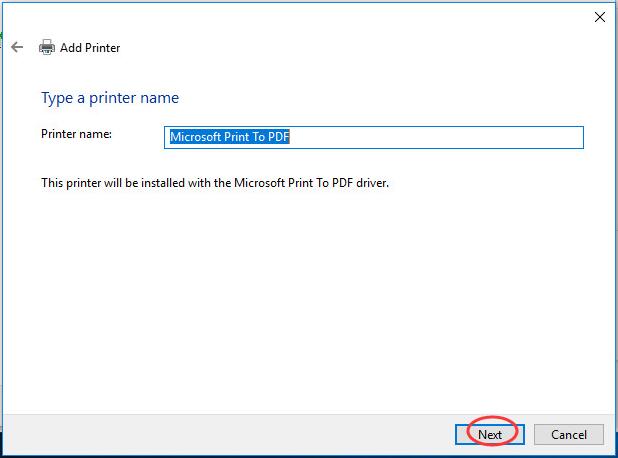
- You have restored the Microsoft Print to PDF. Click Finish to complete the process.
You can use it properly now.
in Windows 11
- On your keyboard, press the Windows logo + R keys simultaneously to open the Run box. Type control panel and hit Enter.
- Make sure you set Category as your view-by. Then find View devices and printers . Click on it.
- Scroll down and click Printers & scanners .
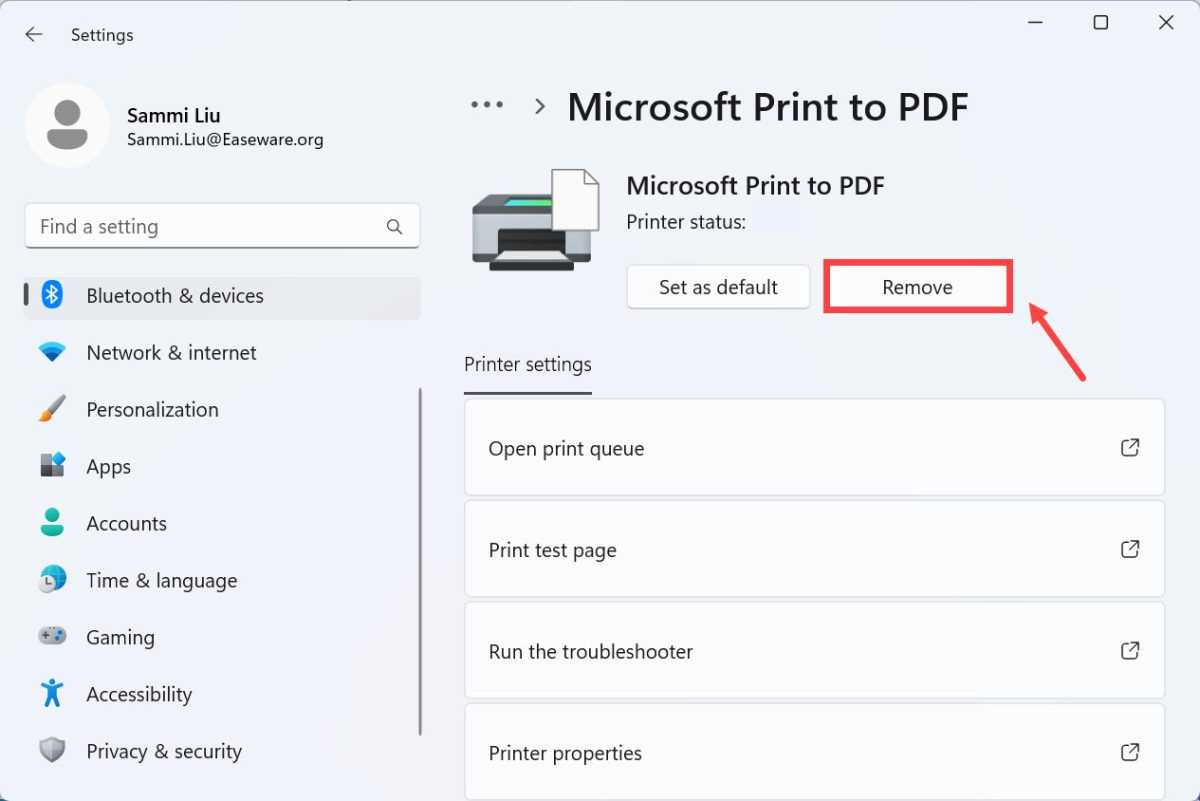
- Find Microsoft Print to PDF and click on it.
- Click on the buttonRemove .
- Back to the Printers & scanners window, you should see the buttonAdd device .
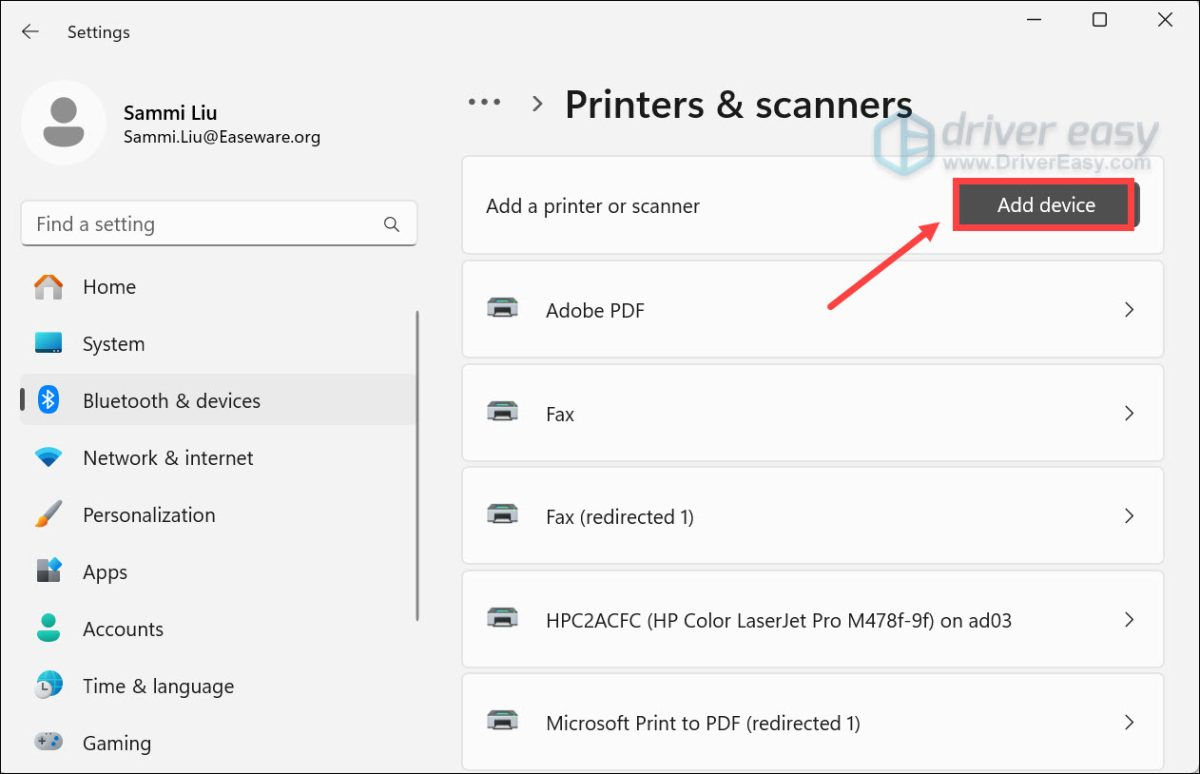
- ClickAdd manually next to The printer that I want isn’t listed.
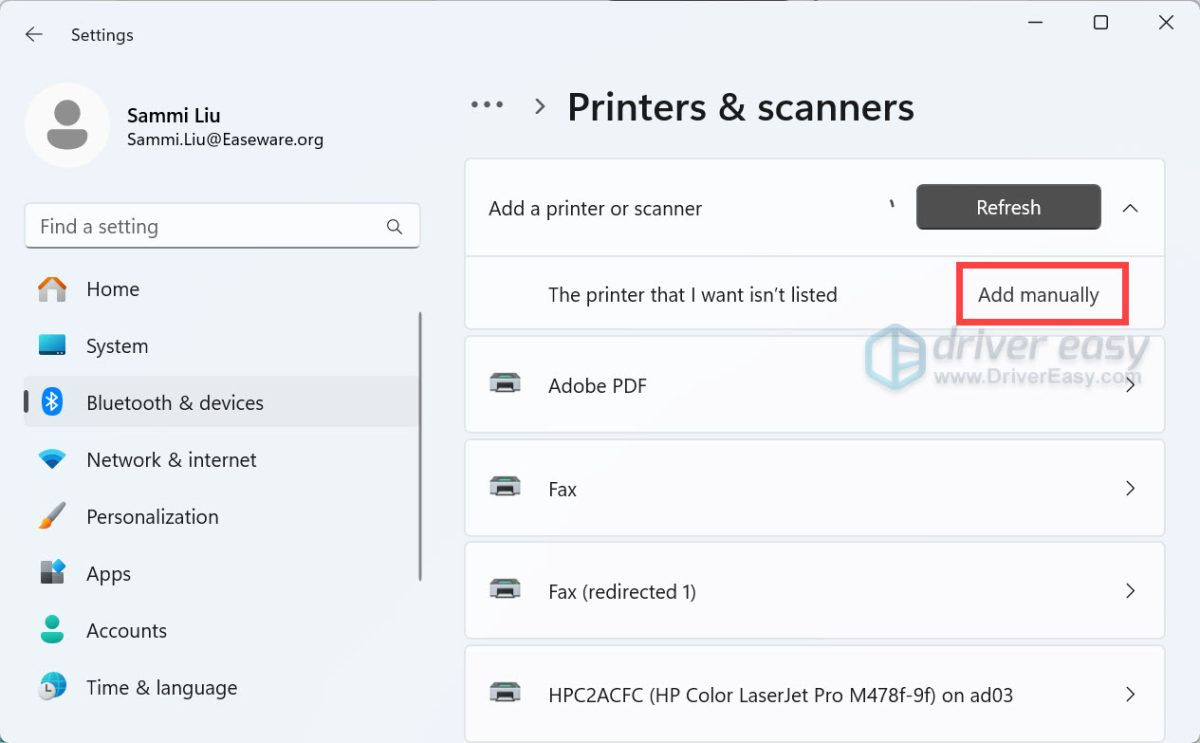
- TickAdd a local printer or network printer with manual settings , then clickNext .

- SelectPORTPROMPT: (Local Port) from the drop-down list, then clickNext .
From the left column, selectMicrosoft . From the right column, selectMicrosoft Print To PDF . Then clickNext .
Follow the on-screen instructions to finish the setup.
That’s all there is to it.
Any questions please feel free to leave your comment below, thanks!
Also read:
- [New] In 2024, Full Spectrum Analysis Unpacking Adobe's Data Preservation and Alternatives
- [Updated] In 2024, Speech Logger Must-Haves for Mac Devices Our Picks of the Best Five
- Decoding Error 0X80004005: Your Ultimate Guide to Overcoming Windows' Unspecified Errors
- Fixing System Errors: A Complete Solution for Mass Effect Legendary Edition on PlayStation, Xbox & PC
- How to Eliminate Red Screen Disruption on Electronics
- How to Fix a Non-Responsive Keyboard on Your Dell Laptop
- How to Fix the Error: Program Was Not Loaded Into Memory Properly ([Error Code 0xC000007B])
- In 2024, How to Bypass FRP on Oppo A18?
- In 2024, How to Track Oppo A18 by Phone Number | Dr.fone
- Isolating Visual Snapshots From Videos Using the Windows 10 Photos Tool for 2024
- Mettre À Jour Votre Stockage: Convertir Un HDD en SSD Sous Windows 10 Sans Reformatage
- Pixel Power Unveiling YouTube's Twitter Crew for 2024
- Quick Solutions: Resolve Your Google Hangouts Microphone Issues Immediately
- Solution: Nonfunctional Keys on Login Screen
- Solving Oddworld: Soulstorm PC Crash Issues – A Comprehensive Guide
- Step-by-Step Guide: Resolving the 'No Video Signal' Monitor Issue
- Troubleshooting Guide: Fixing Brightness Issues in Windows 11
- Unlock the Power of AI: 7 Proven Prompting Secrets for Success
- Urgent Update for Microsoft: Just 1 Year Remaining to Overcome Critical Issues in Windows 10 | TechNewsZDNet
- Title: Microsoft Print to PDF Problems Solved for Windows 10 and 11 Users
- Author: Anthony
- Created at : 2024-10-16 21:39:05
- Updated at : 2024-10-21 17:02:45
- Link: https://win-howtos.techidaily.com/microsoft-print-to-pdf-problems-solved-for-windows-10-and-11-users/
- License: This work is licensed under CC BY-NC-SA 4.0.