Fixing the 'Bad Image' Glitch in Windows 10 & 11: Comprehensive Solutions
Fixing Error 1068 in Windows: A Comprehensive Guide - SOLUTION FOUND
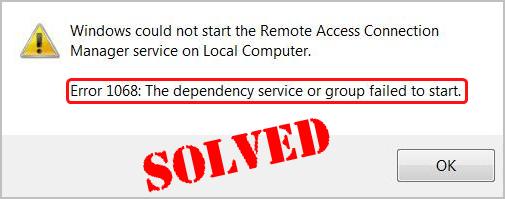
When you attempts to connect your system to a wireless network, if you’re getting theError 1068: The dependency service or group failed to start error on your Windows computer, it could be super frustrating. Don’t worry. You’re certainly not the only one. We’ve seen many users are reporting this issue. More importantly, you can fix it with the solutions here. Read on and see how…
3 Fixes for Error 1068
Solution 1: Restart the WLAN AutoConfig service
This error could happen if the WLAN AutoConfig service isn’t correctly configured on your computer. In this case, you can try to restart the service to solve your problem.
See how to do it:
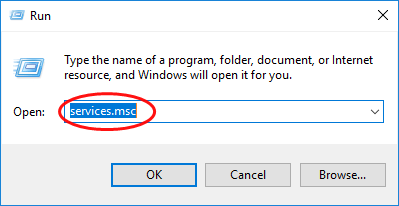
- On your keyboard, hold down theWindows logo key and pressR to bring up the Run box.
- Typeservices.msc , then pressEnter .

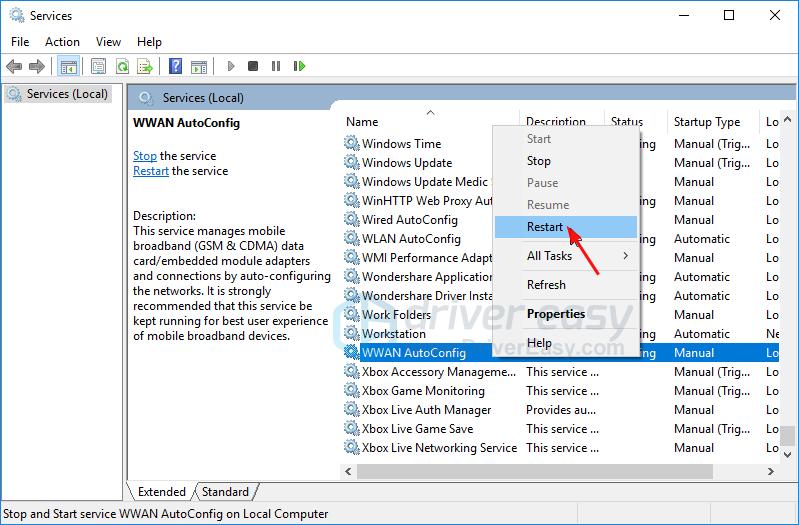
- Right-click onWLAN AutoConfig to selectRestart . If the Restart option grayed out, clickStart instead.
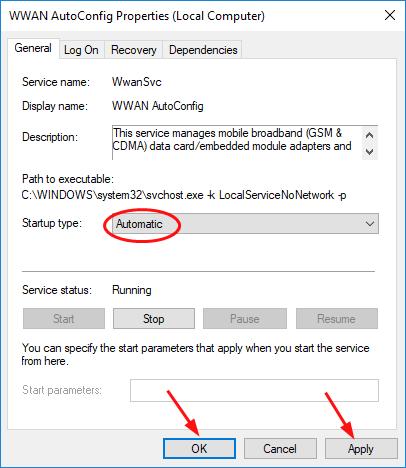
- Double-click WLAN AutoConfig.
- Set the Startup type toAutomatic . ThenApply >OK .
Reboot your Windows computer and the error should disappear. If you’re prompted the error again, there’re something else you can try…
Solution 2: Repair your registry
When your system settings are not configured properly, this error may also occur. You can solve it through repairing your registry.
Here’s how you can do it:
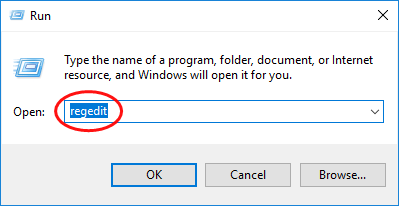
- On your keyboard, hold down theWindows logo key and pressR to bring up the Run box.
- Typeregedit , then pressEnter .
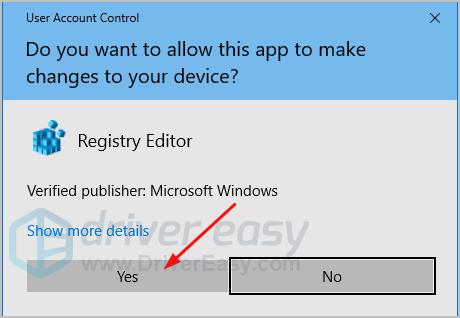
- ClickYes when prompted by User Account Control.
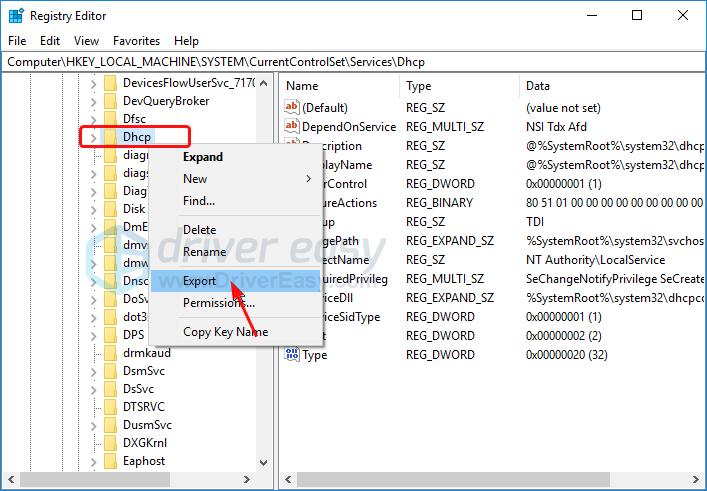
- Go toHKEY_LOCAL_MACHINE >SYSTEM >CurrentControlSet >Services .
- Right-clickDhcp under the Services section to selectExport .
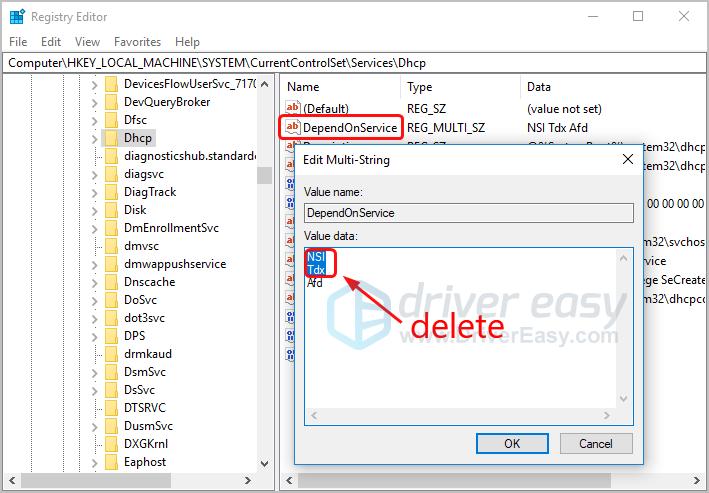
Give a name for the backup file, say Dhcp backup. Then select a backup address and clickSave . You can restore the file from this backup if any error occurs during the process below. - Double-click DependOnService on the right pane of Dhcp. Select all the wordsexcept “Afd” , thendelete them.

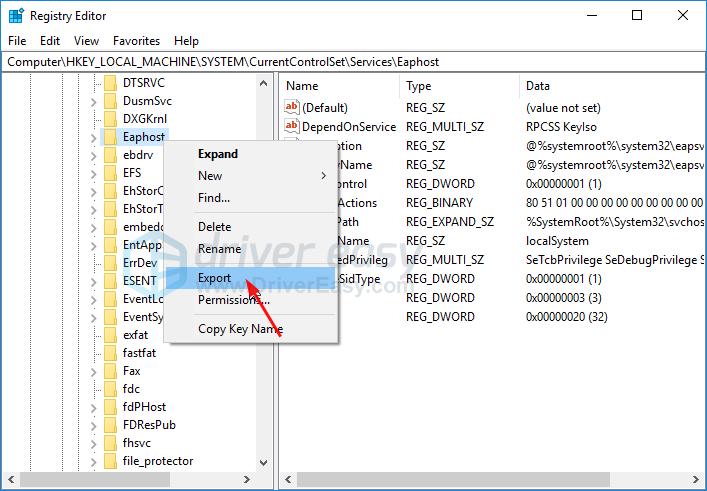
- Right-clickEaphost under the Services section to selectExport .
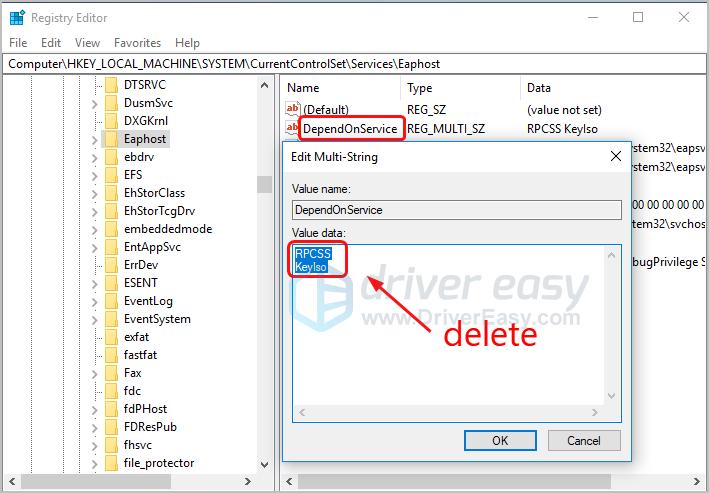
Give a name for the backup file, say Eaphost backup.Then select a backup address and clickSave . - Double-click DependOnService on the right pane of Eaphost. Select all the words and delete them.
Close the Registry Editor window and reboot your Windows computer. Check if the error disappears. If you still see the error, don’t give up hope. Simply move onto next solution.
Solution 3: Update your network adapter driver
This problem could be also due toa corrupted, old or missing network driver on your system. So you can solve it through updating your network driver.
Updating drivers require Internet connection on your computer. If your computer can’t access the wireless network, try to connect your computer to a wired network connection or, you can try theOffline Scan feature of Driver Easy.
You can update your network driver either manually or automatically.
Manual driver update
You can update your network driver manually by going to the manufacturer’s website for your network adapter, say,Realtek , and searching for the most recent correct driver. Be sure to choose only drivers that are compatible with your Windows version.
Automatic driver update
If you don’t have the time, patience or computer skills to update your network driver manually, you can, instead, do it automatically with Driver Easy . Driver Easy will automatically recognize your system and find the correct driver for your exact network adapter, and your Windows version, and it will download and install them correctly.
You can clickUpdate All to automatically download and install the correct version of all the drivers that are missing or out of date on your system. (This requires the Pro version which comes withfull support and a30-day money back guarantee . You’ll be prompted to upgrade when you click Update All.)
You’re done. Feel free to comment below if you have any question.
Also read:
- [New] Samsung Galaxy S8 In-Depth 4K Phone Analysis
- [Updated] Optimizing Trailer Vibes The Melody Essentials
- [Updated] Smooth Blur Magic for Instagram's Story Moments
- Connecting Your PlayStation 5 DualSense Controller with Windows 11 - A Step-by-Step Guide
- Fixing Windows 10 USB Connectivity Problems: A Guide to Handling Unknown Devices & Failed Port Resets
- Halo 4 and Unreal Engine 4 - Overcoming the Critical 2024 UE4 Game Crash Issue
- In 2024, The Ultimate Guide How to Bypass Swipe Screen to Unlock on Nokia C22 Device
- Innovative Gadgets Ranked #11 Auditory Capture Guide for 2024
- Leading Minds Discuss Global AI Trends
- Overcoming Obstacles: Successfully Instaling the Windows 10 July 2016 Update (Version 1607)
- Overcoming the Challenge of a Non-Charging but Plugged-In Surface: A Comprehensive Guide
- Script Inactive: No Launch
- Smooth iPhone Screen Recording Made Simple for 2024
- Understanding the Role of SFC and Deployment Image Servicing in Fixing Windows 11 Issues
- Unexpected Silence? Revive Your Touchpad's Display!
- USB to HDMI Bridge Malfunction? Here's How to Solve It
- Windows Media Creator Alternatives
- Title: Fixing the 'Bad Image' Glitch in Windows 10 & 11: Comprehensive Solutions
- Author: Anthony
- Created at : 2024-12-17 18:51:06
- Updated at : 2024-12-22 16:04:47
- Link: https://win-howtos.techidaily.com/fixing-the-bad-image-glitch-in-windows-10-and-11-comprehensive-solutions/
- License: This work is licensed under CC BY-NC-SA 4.0.