
Fix the Missing or Old Version of Widevine Content Decryption in Windows Easily
Overcoming the Mystery of Failed USB Recognition in Windows - Fixed Now
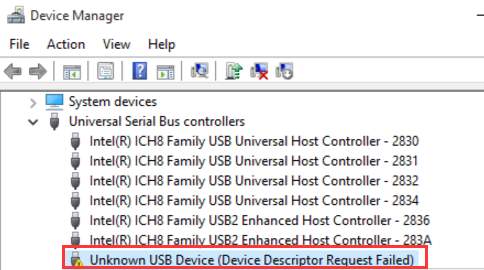
If your external USB device is not recognized by Windows 10, and meet Unknown USB Device (Device Descriptor Request Failed) error in Device Manager, use solutions here to troubleshoot and fix the error.
As you have noticed, the USB Device inDevice Manager has a yellow triangle on it:
The error can be caused by hardware issues. So first, follow below simple instructions to do the troubleshooting.
1. Try the device on a different USB port. This will figure out if the problem is caused by a broken port.
2. Connect the device to another PC. This will figure out if the external device has a problem.
If there is no problem with the USB port and the device, read on and try the following methods. You can start at the top of the list and work your way down.
Method 1: Remove the Power Supply
Method 2: Uninstall the USB Driver in Device Manager
Method 3 : Update the USB Driver
Method 4: Disable Fast Startup
Method 5: Change the USB Selective Suspend Settings
Method 1: Remove the Power Supply
This method will fix the problem magically if the problem is caused by Power Supply.
1. Remove the Power Supply plug from the PC.
2. Re-plug in the Power Supply.
3. Restart the PC and connect the device to the USB port.
Method 2: Uninstall the USB Driver in Device Manager
Follow these steps:
1. Open Device Manager and expand the category Universal Serial Bus Controllers and locate the USB device that is not being recognized by Windows.
2. Right-click on the device and selectUninstall from the context menu.
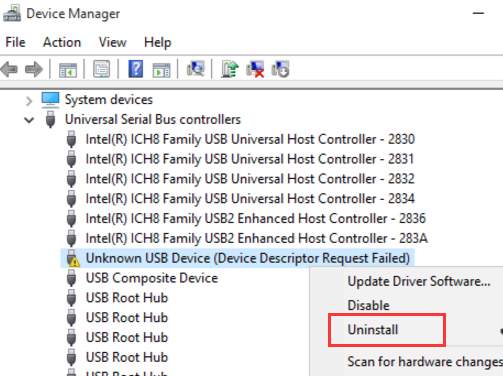
3. After finishing the uninstallation, restart your PC then Windows will reinstall the device automatically.
Method 3 : Update the USB Driver
The problem can be caused by a faulty USB driver. In this case, updating the driver would fix the problem.
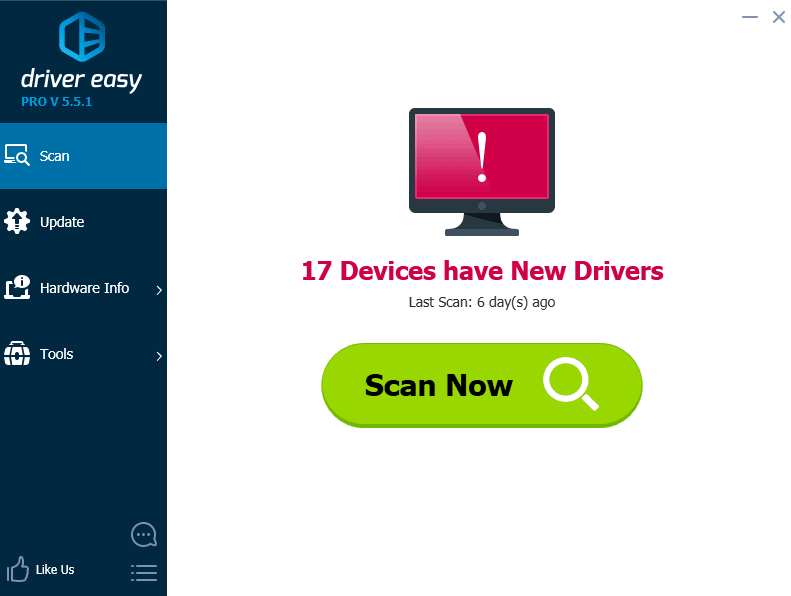
If you’re not confident playing around with drivers manually, you can do it automatically with Driver Easy .
Driver Easy will automatically recognize your system and find the correct drivers for it. You don’t need to know exactly what system your computer is running, you don’t need to risk downloading and installing the wrong driver, and you don’t need to worry about making a mistake when installing.
You can update your drivers automatically with either the FREE or the Pro version of Driver Easy. But with the Pro version, it takes just 2 clicks (and you get full support and a 30-day money-back guarantee):
1. Download and install Driver Easy.
2. Run Driver Easy and click the Scan Now button. Driver Easy will then scan your computer and detect any problem drivers.
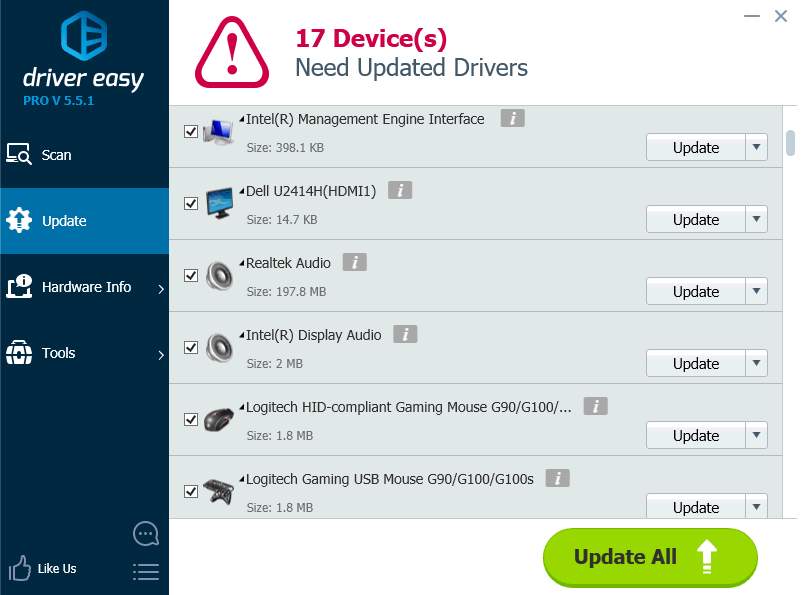
3. Click the Update button next to a flagged USB driver to automatically download and install the correct version of this driver (you can do this with the FREE version). Or click Update All to automatically download and install the correct version of all the drivers that are missing or out of date on your system (this requires the Pro version – you’ll be prompted to upgrade when you click Update All).
Method 4: Disable Fast Startup
If Windows is booting quickly, the external device may not be detected before the boot is completed, then the problem will occur. In this case, disabling the fast boot option in Power Options can resolve the problem.
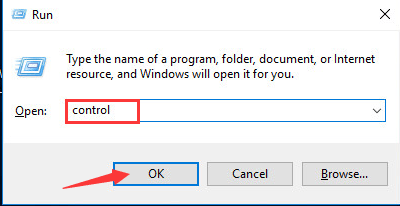
1. PressWin+R (Windows logo key and R key) at the same time. A Run dialog box will appear.
2. Typecontrol in the run box and click the OK button. This is to open theControl Panel .
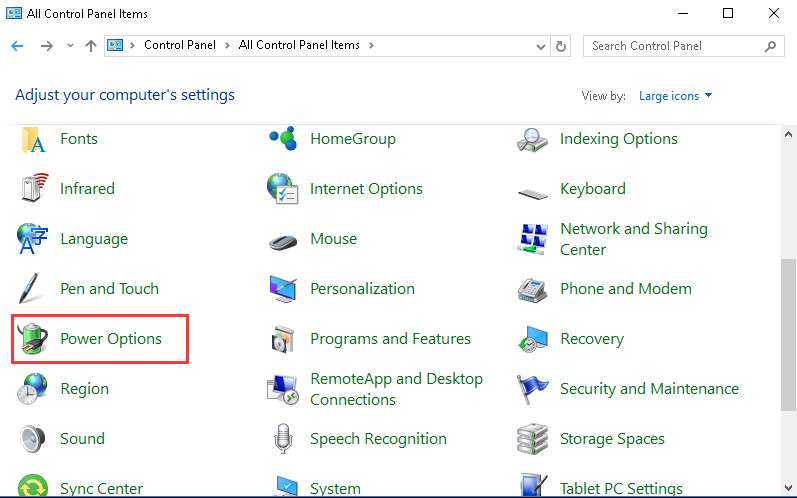
3. View by Large Icons and click onPower Options .
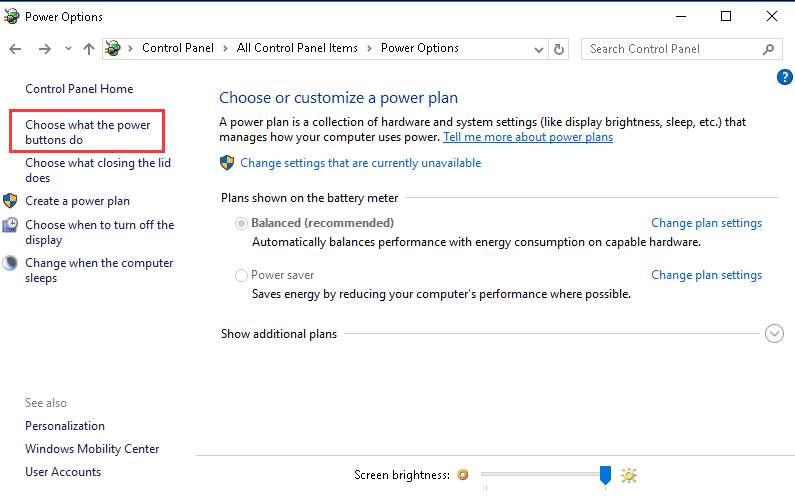
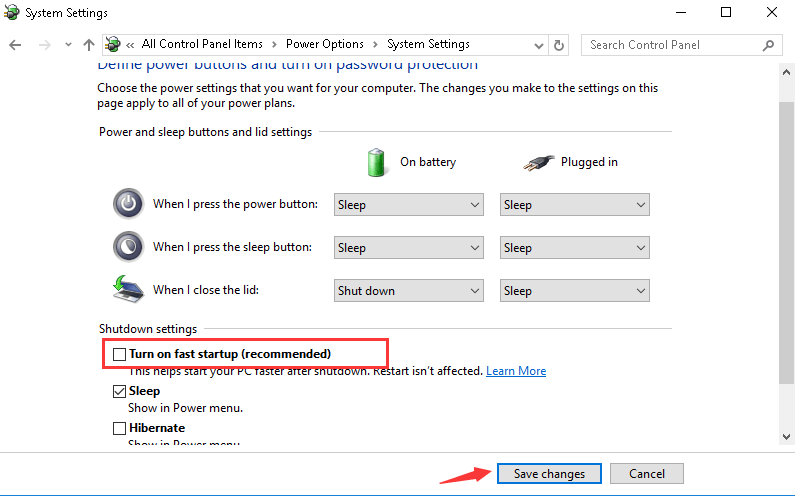
4. SelectChoose what the power buttons do in the left pane.
5. Click onChange settings that are corrently unavailable .
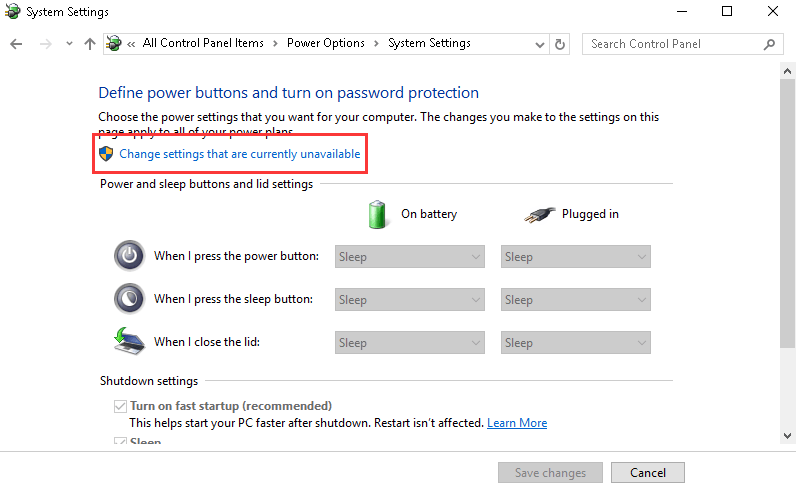
6. UnderShutdown settings , uncheck the box next toTurn on fast startup (recommended) . Then click on theSave changes button.
7. Restart your PC and see if the problem resolves. Note your PC will boot a little slower.
Method 5: Change the USB Selective Suspend Settings
Follow these steps:
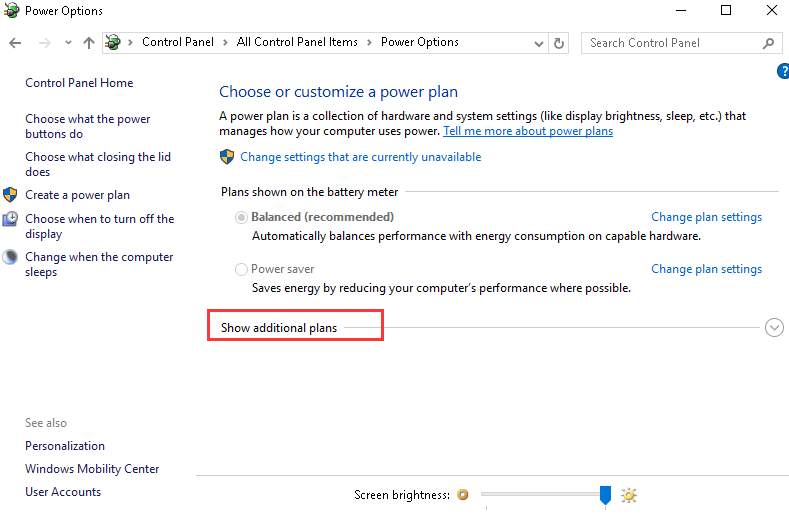
1. In Power Options , click onShow additional plans . (If you tried Method 2, you must know how to go to Power Options. If not, go back to Method 2 and refer to the steps to open Power Options.)
2. ClickChange settings that are currently unavailable .
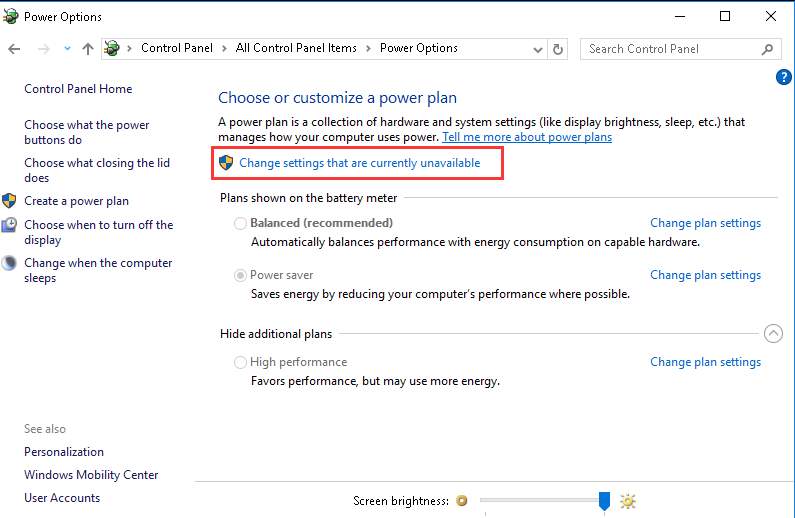
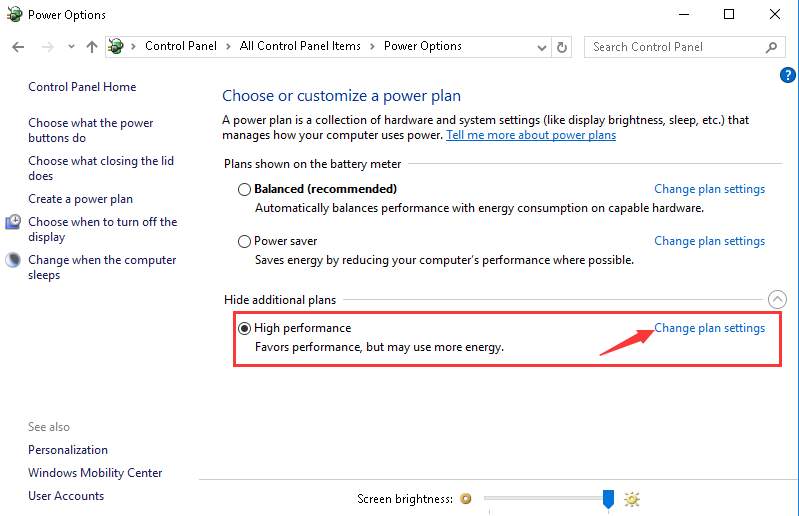
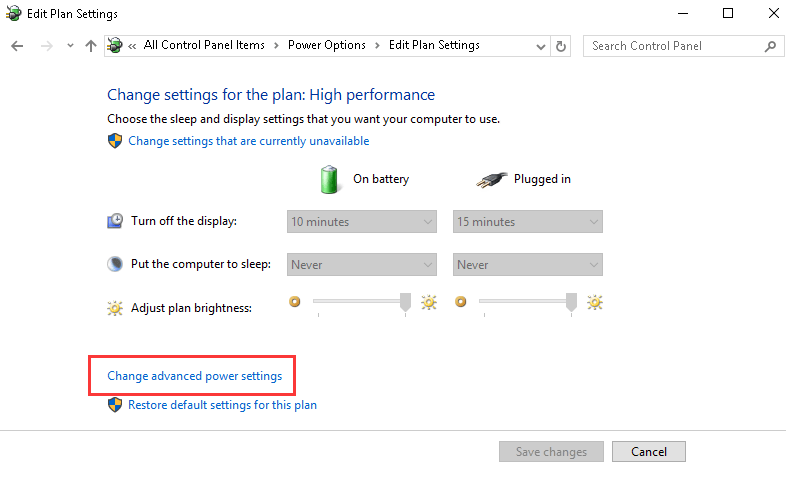
3. Select High performance and click onChange plan settings .
4. Click onChange advanced power settings .
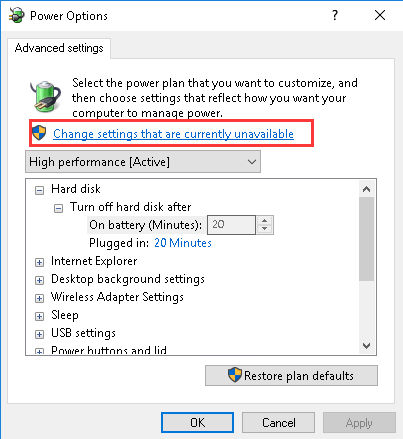
5. Click onChange settings that are currently unavailable .
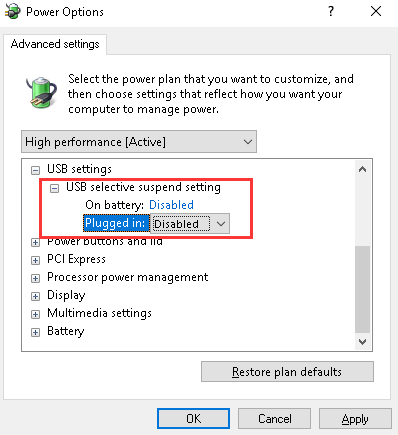
6. LocateUSB settings and expand it.
7. ExpandUSB selective suspend setting . Disable bothOn battery andPlugged in settings.
8. Click theApply button and restart your computer.
After using the methods in this post, you must resolve the Device Descriptor Request Failed error for Windows 10.
Also read:
- [New] 2024 Approved From Visionary to Victory Channel Command School
- [New] Beatback Bungalow Recordings Downloads & Reviews for 2024
- [Updated] In 2024, Adding Depth with Customized Facebook Slideshows
- [Updated] Navigating the Top Android Collage App Landscape
- [Updated] Tips From Pros Elevating Your Twitch Video Quality for 2024
- Bright Ideas: How to Restore Light on a Non-Responsive Corsair Keyboard
- Diagnosing and Resolving USB Port Failures in Windows 10 & 11 Computers Efficiently
- Fixing the Cause of Window 10'S Screen Tremors: A Step-by-Step Guide
- Get the Latest Drivers for Your Logitech Bluetooth Mouse on Windows Computers
- GTX 950 Code 43 Driver Error on Windows 10 - A Step-by-Step Fix
- How to Fix Microsoft's Wireless Display Adapter When It Fails to Pair with Windows 10
- In 2024, How to Reset your Nokia C12 Plus Lock Screen Password
- Master the Solution for System Error 5 on Windows 10, 7, and 8: A Complete Fix Tutorial
- Mejores Técnicas Para Reducir El Tamaño De Videos en YouTube Sin Perder Calidad
- Optimizing System Resources: Reducing MsMpEng.exe Load in Windows 11
- Resolve Windows 11 Error Code 0X80070426: Step-by-Step Troubleshooting Guide
- Speeding Up Your Windows 11 Shutdown Process: Tips & Tricks That Work
- The Next Generation of Compression: How Does AV1 Stack Up Against HEVC for Enhanced Media Delivery?
- Troubleshooting Steps for Correcting the DX11 Feature Level 10.0 Glitch in WWE 2K Battlegrounds
- Title: Fix the Missing or Old Version of Widevine Content Decryption in Windows Easily
- Author: Anthony
- Created at : 2024-12-22 12:45:12
- Updated at : 2024-12-27 16:08:26
- Link: https://win-howtos.techidaily.com/fix-the-missing-or-old-version-of-widevine-content-decryption-in-windows-easily/
- License: This work is licensed under CC BY-NC-SA 4.0.