
Expert Tips for Correcting and Preventing Windows Error 0xC00000^XE9 – A Detailed Guide
Troubleshooting and Correcting Error 0X80070091 During Windows 11 System Restore - Solved

A lot Windows 10 users reported that system restore did not complete successfully. And the problem pop-uped asError 0x80070091shown as image above. It’s a good thing that Microsoft has noticed this error and will update this thread soon. However, if you are Windows 10 Advanced user, you can fix it right now via the methods below. If you’ve faced it, just go with the easy fixes below.
Fix One. Rename the WindowsApps folder in Safe Mode
Boot your Windows 10 into safe mode:
How to:
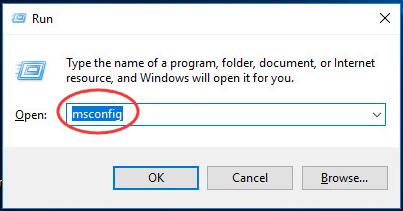
a)
Open run dialog box by pressingWindows key + R key together.
Then type msconfig in the box and hit Enter.
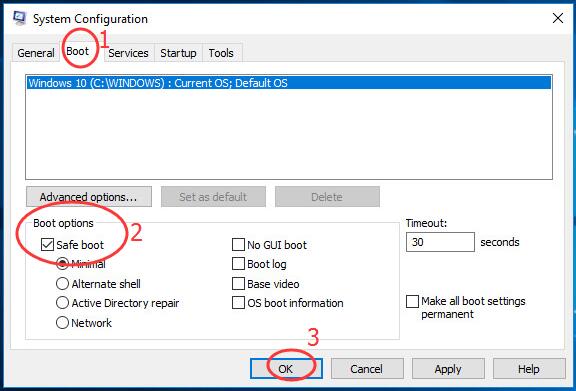
b)
On the pop-up window, view on Boot pane.
Then tick on Safe bootand click OK.
Click Restart, if prompted by system configuration
Then your Windows 10 would get into safe mode.
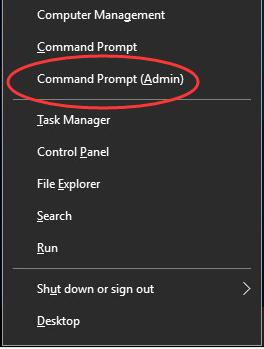
Open quick-access menu by pressing Windows key + X key.
Then click Command Prompt(Admin) to run it as administrator.
When prompted by User Account Control, click Yes.
Type the following commands and hit Enter to run them one by one:
• cd C:\Program Files
• takeown /f WindowsApps /r /d Y
• icacls WindowsApps /grant “%USERDOMAIN%\%USERNAME%”:(F) /t
• attrib WindowsApps -h
• rename WindowsApps WindowsApps.old
Follows the a) & b) of Step 1 to openSystem ConfigurationWindow.
This time uncheck Safe boot to reboot your Windows 10.
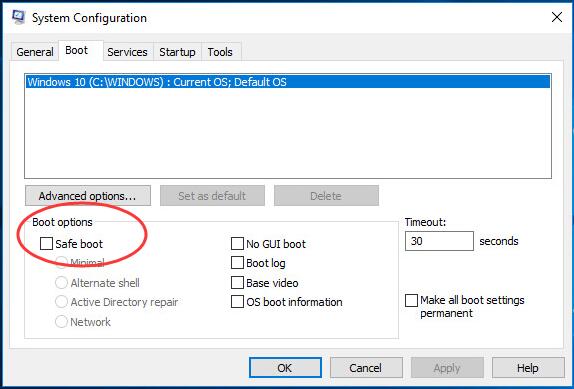
When it finish rebooting, run System Restore again.
Fix Two. Rename the WindowsApps folder in WinRE
Boot your Windows 10 into WinRE(Windows Recovery Environment)
How to:
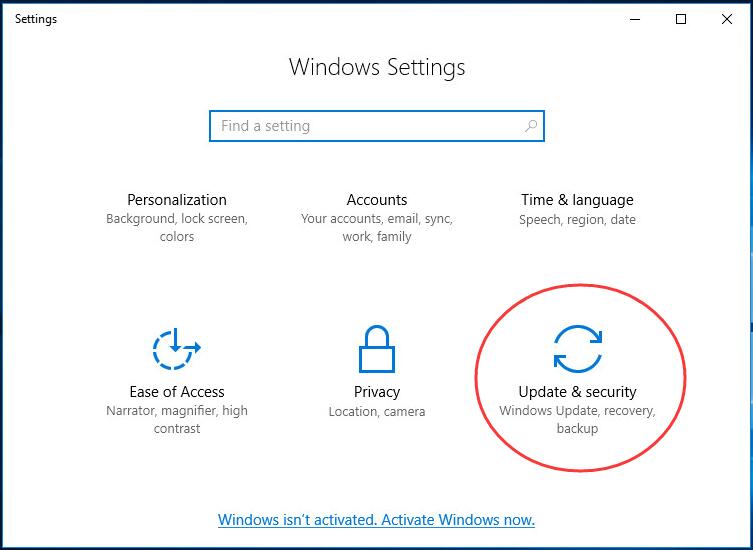
a)
Open Settings Window by pressing Windows key + I key.
Then click Update & security.
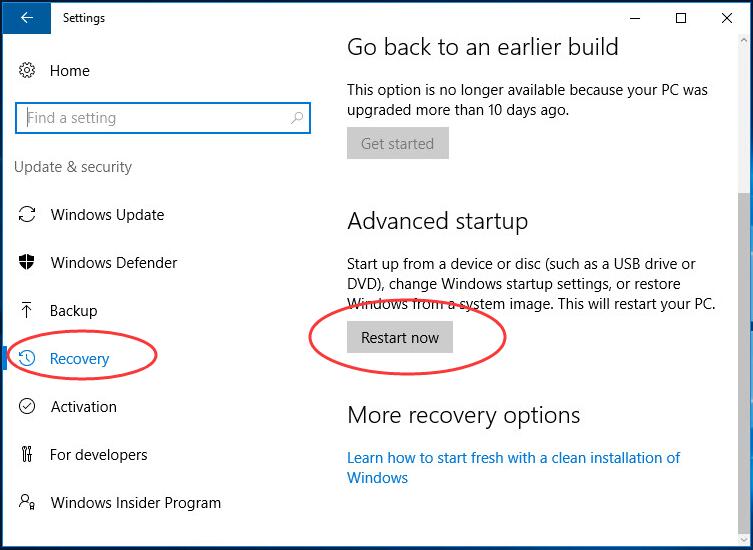
b)
Click Recovery.
Then scroll down on the right side and click Restart now under Advanced startup .
c)
ClickTroubleshoot > Advanced >Command Prompt.
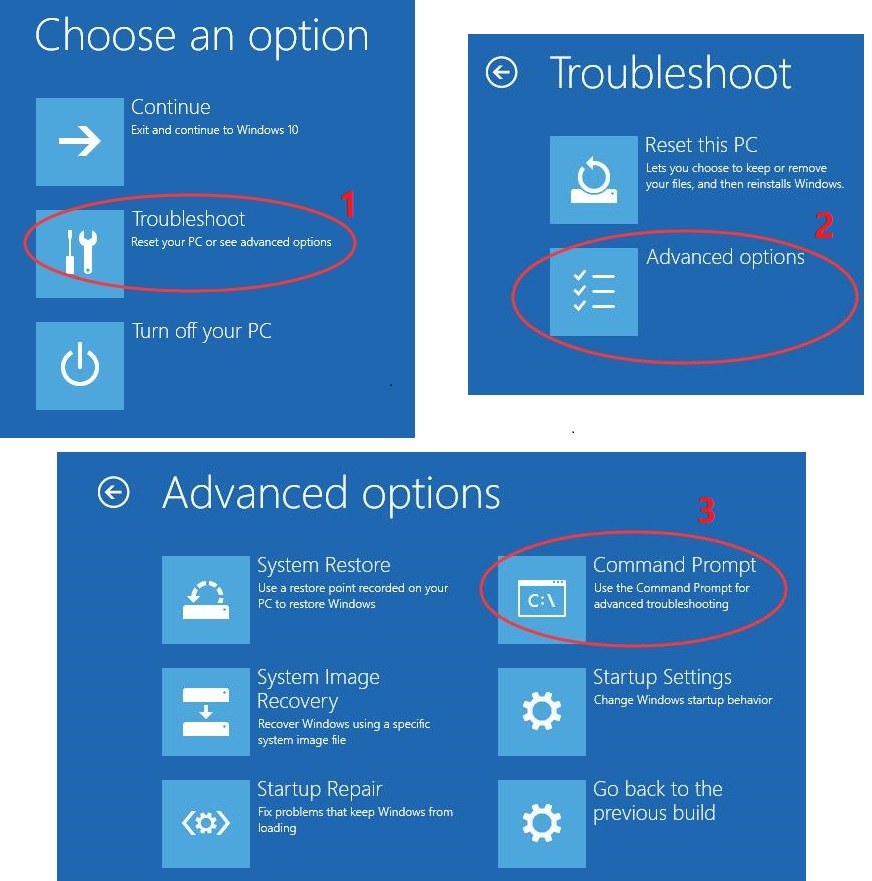
Type the following commands and hit Enter to run them one by one:
• cd C:\Program Files
• attrib WindowsApps -h
• rename WindowsApps WindowsApps.old
Reboot your Windows 10, then run System Restore again.
That’s it!
Also read:
- [New] APK Essentials Start Playing Funimate Now
- [New] In 2024, Sound Selection Secrets Top 7 Free Effects for YouTube
- [New] Unlock the Potential of YouTube Videos The Ultimate Chapter Addition Technique
- [Updated] Mastering GoPro Fixing Fish Eye Effects in Video
- Dimming Mystery: Device Dilemma
- Effective Solutions for Reducing svchost.exe NETSVCS's Impact on Internet Bandwidth
- Effective Techniques to Rectify Connectivity Issues with an AOC Monitor for a Smooth Windows 11 Experience
- Fixes for When Your Lenovo's Print Recognition Malfunctions
- How to Share/Fake Location on WhatsApp for Oppo A1 5G | Dr.fone
- In 2024, Does find my friends work on Apple iPhone 6 Plus | Dr.fone
- In 2024, Masterful Methods to Add a Secure Link to Your TikTok Profile
- Lag-Free Gaming Achieved: Fixing Slowness Issues in League of Legends
- League of Legends Boost Trick - Get Your Game Running Faster Now
- New Exploring the Peaks of MAGIX Samplitude A Comprehensive Review
- Temporary Setback: Re-Establishing Connection to Your Windows SmartScreen Security
- Top Solutions for Unfreezing Your Windows 11 Taskbar: Expert Tips & Tricks
- Troubleshooting & Solutions: Resolve the LiveKernelEvent 144 Mistake
- Title: Expert Tips for Correcting and Preventing Windows Error 0xC00000^XE9 – A Detailed Guide
- Author: Anthony
- Created at : 2025-01-24 17:27:30
- Updated at : 2025-01-25 16:32:05
- Link: https://win-howtos.techidaily.com/expert-tips-for-correcting-and-preventing-windows-error-0xc00000xe9-a-detailed-guide/
- License: This work is licensed under CC BY-NC-SA 4.0.