
Diagnosing and Resolving USB Port Failures in Windows 10 & 11 Computers Efficiently
Deciphering and Resolving Error 0X80070091 for Successful System Restores in Windows 11 - Expert Tips

A lot Windows 10 users reported that system restore did not complete successfully. And the problem pop-uped asError 0x80070091shown as image above. It’s a good thing that Microsoft has noticed this error and will update this thread soon. However, if you are Windows 10 Advanced user, you can fix it right now via the methods below. If you’ve faced it, just go with the easy fixes below.
Fix One. Rename the WindowsApps folder in Safe Mode
Boot your Windows 10 into safe mode:
How to:
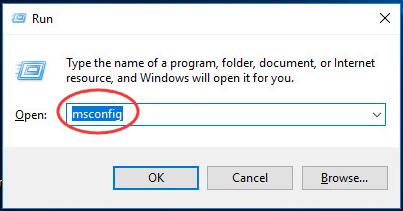
a)
Open run dialog box by pressingWindows key + R key together.
Then type msconfig in the box and hit Enter.
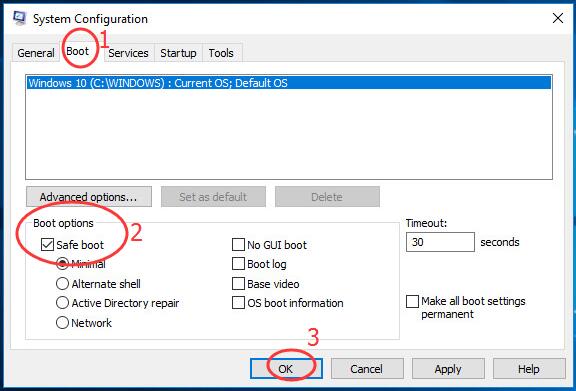
b)
On the pop-up window, view on Boot pane.
Then tick on Safe bootand click OK.
Click Restart, if prompted by system configuration
Then your Windows 10 would get into safe mode.
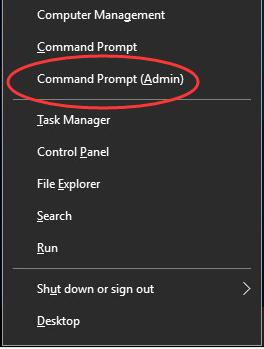
Open quick-access menu by pressing Windows key + X key.
Then click Command Prompt(Admin) to run it as administrator.
When prompted by User Account Control, click Yes.
Type the following commands and hit Enter to run them one by one:
• cd C:\Program Files
• takeown /f WindowsApps /r /d Y
• icacls WindowsApps /grant “%USERDOMAIN%\%USERNAME%”:(F) /t
• attrib WindowsApps -h
• rename WindowsApps WindowsApps.old
Follows the a) & b) of Step 1 to openSystem ConfigurationWindow.
This time uncheck Safe boot to reboot your Windows 10.
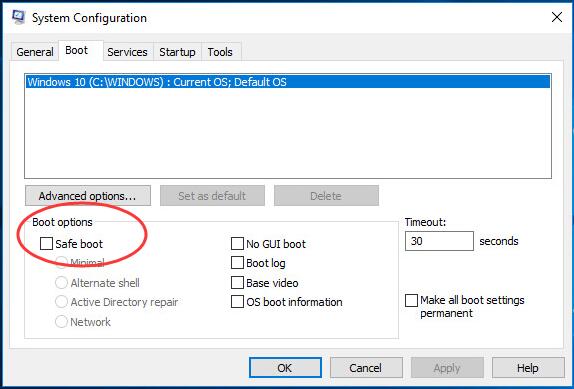
When it finish rebooting, run System Restore again.
Fix Two. Rename the WindowsApps folder in WinRE
Boot your Windows 10 into WinRE(Windows Recovery Environment)
How to:
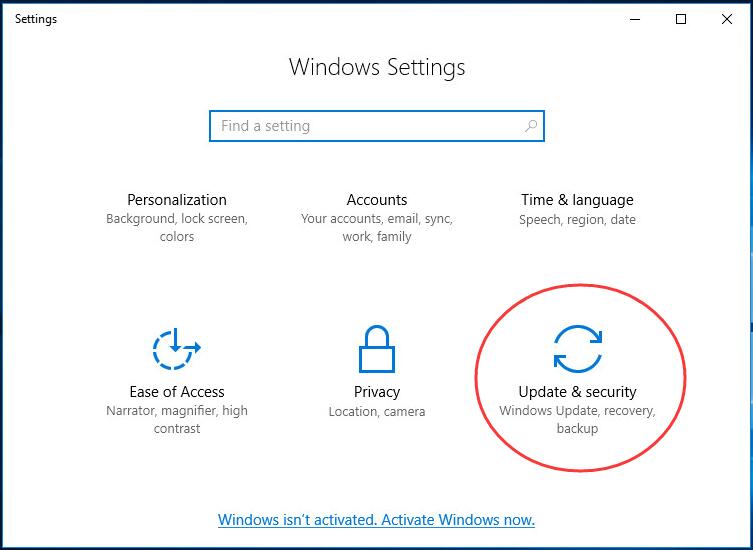
a)
Open Settings Window by pressing Windows key + I key.
Then click Update & security.
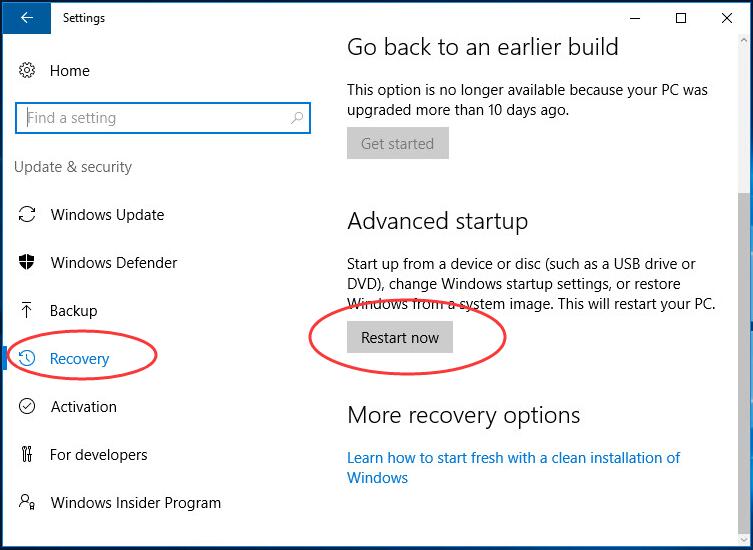
b)
Click Recovery.
Then scroll down on the right side and click Restart now under Advanced startup .
c)
ClickTroubleshoot > Advanced >Command Prompt.
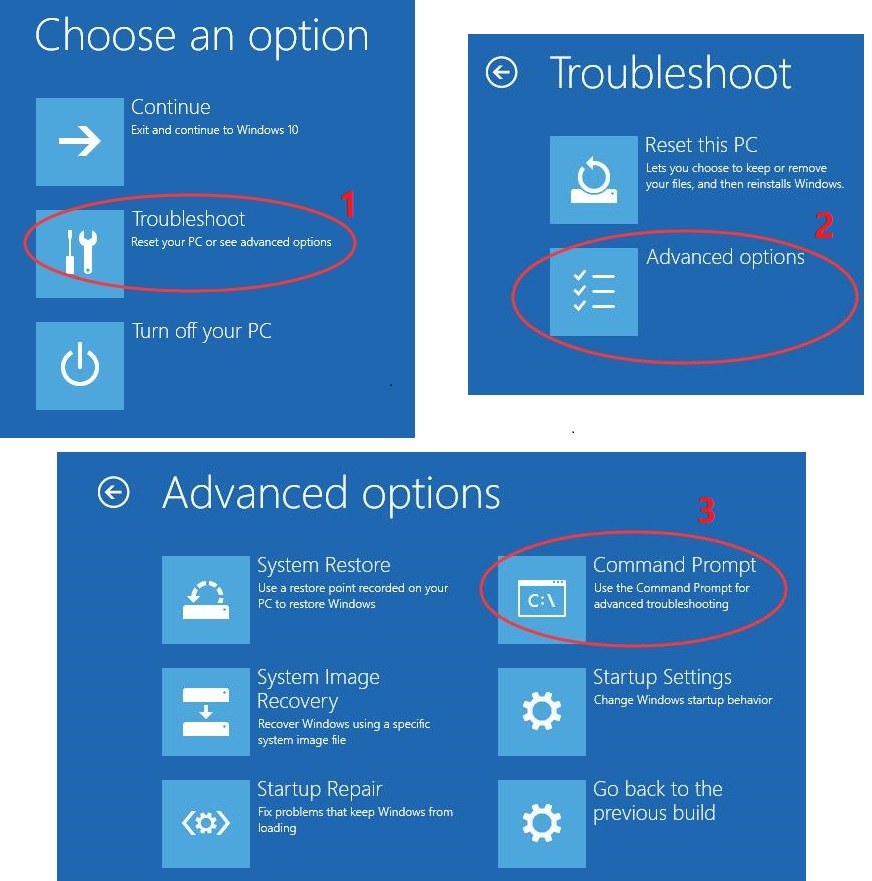
Type the following commands and hit Enter to run them one by one:
• cd C:\Program Files
• attrib WindowsApps -h
• rename WindowsApps WindowsApps.old
Reboot your Windows 10, then run System Restore again.
That’s it!
Also read:
- [New] 2024 Approved The Compreeved List of Non-Bandicamp Capture Software on Mac
- [Updated] From Vlogs to Virality Jake Paul, the Online Phenomenon for 2024
- Bluetooth Troubleshooting: Restoring Device Recognition Capabilities on Windows nT
- Bypass and Repair: Addressing the Lenovo Function Key Issues Effectively
- How to Fix Android.Process.Media Has Stopped on Motorola Razr 40 Ultra | Dr.fone
- How to Fix High Disk Usage Caused by Microsoft Compatibility Telemetry on Windows 10 Computers
- How to Fix the Audio Error 0Xc00d36b4 in Windows 10 & 11
- In 2024, How to Change Location on TikTok to See More Content On your Vivo V27e | Dr.fone
- Master the Solution: Overcoming 'Initializing' Delays in Destiny 2 Gaming Experience
- Mastering Lag-Free Gaming on PC : Essential Fixes & Optimization Tactics
- Resolved: Quick Fixes for Critical Cx_Freeze Software Crashes
- Solving the Dilemma: Effective Solutions for Persistent Mouse Disconnection Issues
- Top 4 Fantastic No-Cost Web-Based Calendar Apps
- Troubleshooting Guide: Resolving Non-Functional Windows Key Issues on Windows 10
- Windows Regional Configuration Tips and Tricks by YL Software for Optimal User Experience
- Title: Diagnosing and Resolving USB Port Failures in Windows 10 & 11 Computers Efficiently
- Author: Anthony
- Created at : 2025-01-14 16:14:45
- Updated at : 2025-01-19 20:08:35
- Link: https://win-howtos.techidaily.com/diagnosing-and-resolving-usb-port-failures-in-windows-10-and-11-computers-efficiently/
- License: This work is licensed under CC BY-NC-SA 4.0.