
Demystifying and Solving the Persistent Black Monitor Issue on Windows 11 Computers
Deciphering and Resolving Error 0X80070091 for Successful System Restores in Windows 11 - Expert Tips

A lot Windows 10 users reported that system restore did not complete successfully. And the problem pop-uped asError 0x80070091shown as image above. It’s a good thing that Microsoft has noticed this error and will update this thread soon. However, if you are Windows 10 Advanced user, you can fix it right now via the methods below. If you’ve faced it, just go with the easy fixes below.
Fix One. Rename the WindowsApps folder in Safe Mode
Boot your Windows 10 into safe mode:
How to:
a)
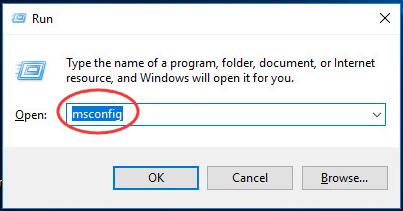
Open run dialog box by pressingWindows key + R key together.
Then type msconfig in the box and hit Enter.
b)
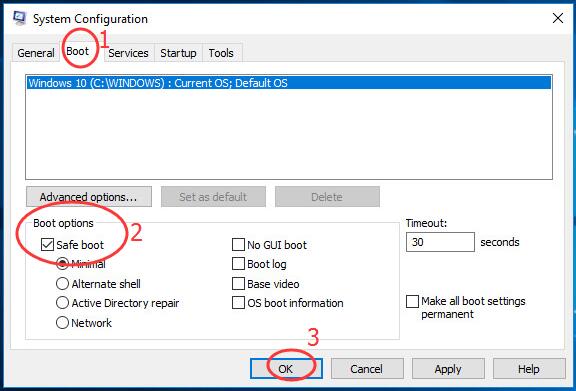
On the pop-up window, view on Boot pane.
Then tick on Safe bootand click OK.
Click Restart, if prompted by system configuration
Then your Windows 10 would get into safe mode.
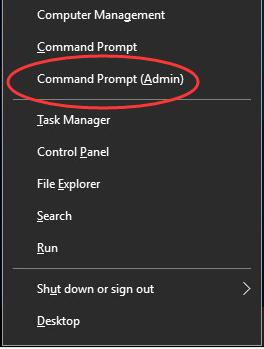
Open quick-access menu by pressing Windows key + X key.
Then click Command Prompt(Admin) to run it as administrator.
When prompted by User Account Control, click Yes.
Type the following commands and hit Enter to run them one by one:
• cd C:\Program Files
• takeown /f WindowsApps /r /d Y
• icacls WindowsApps /grant “%USERDOMAIN%\%USERNAME%”:(F) /t
• attrib WindowsApps -h
• rename WindowsApps WindowsApps.old
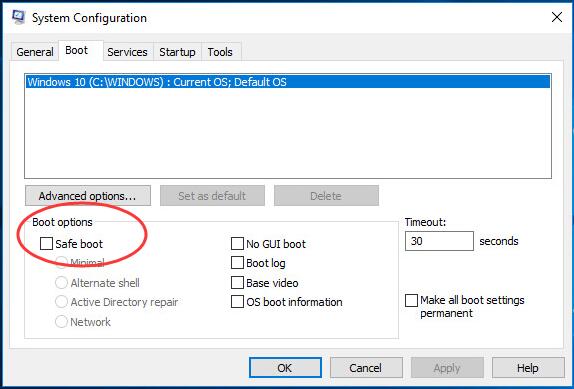
Follows the a) & b) of Step 1 to openSystem ConfigurationWindow.
This time uncheck Safe boot to reboot your Windows 10.
When it finish rebooting, run System Restore again.
Fix Two. Rename the WindowsApps folder in WinRE
Boot your Windows 10 into WinRE(Windows Recovery Environment)
How to:
a)
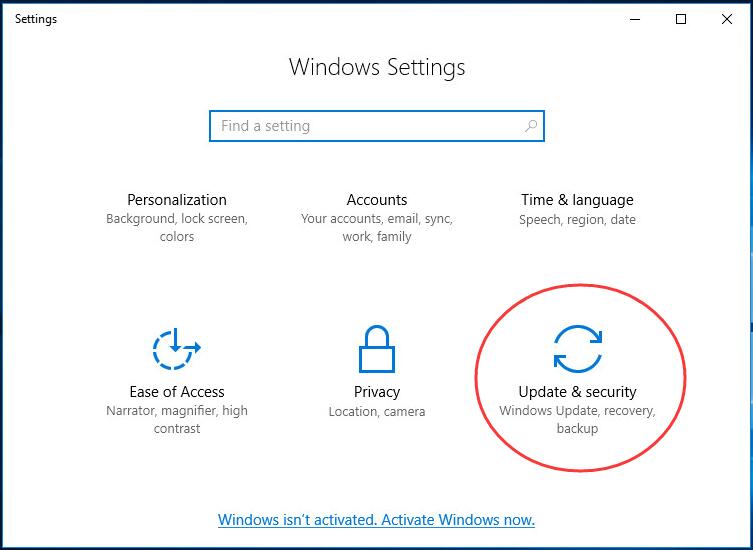
Open Settings Window by pressing Windows key + I key.
Then click Update & security.
b)
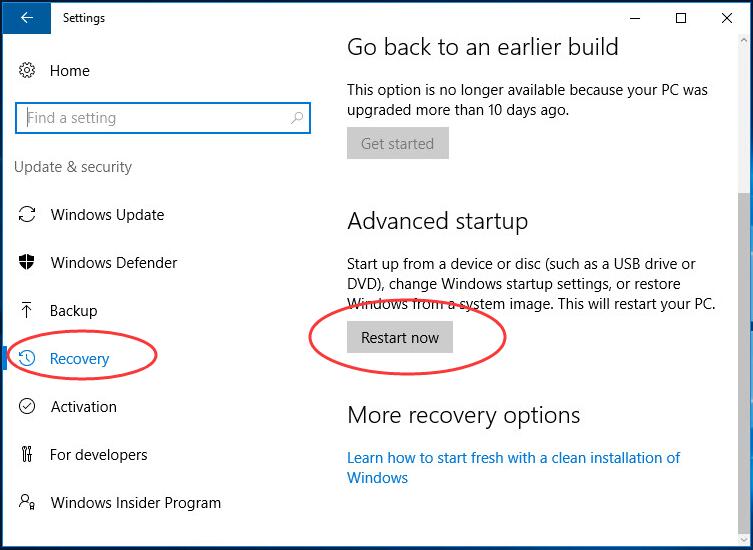
Click Recovery.
Then scroll down on the right side and click Restart now under Advanced startup .
c)
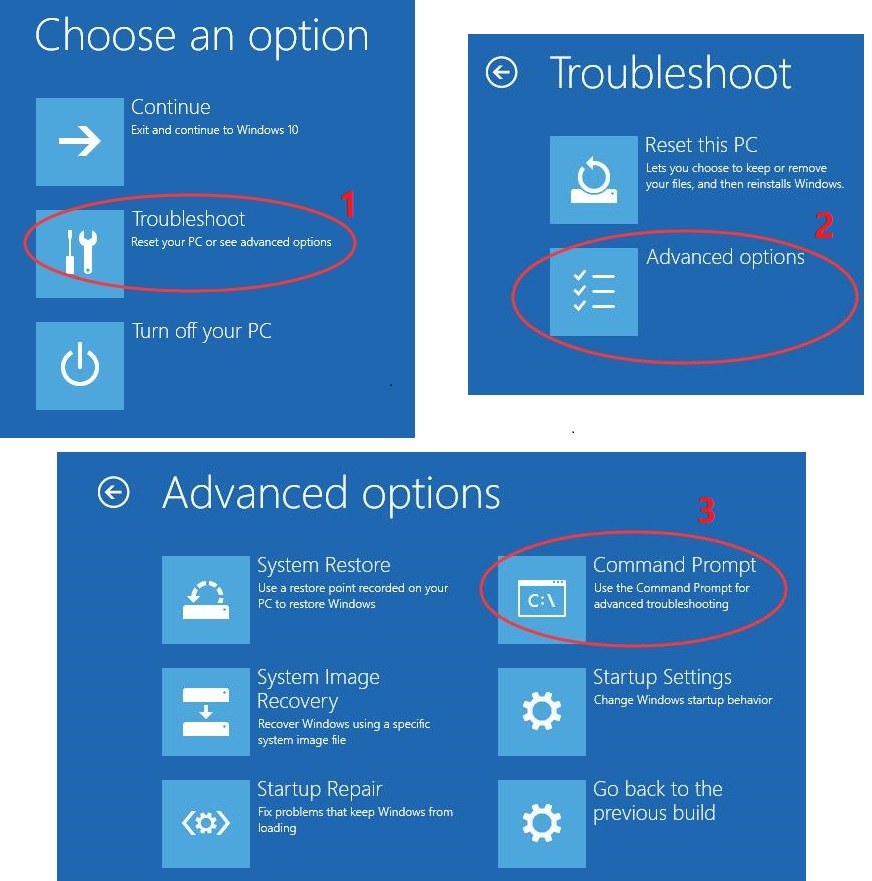
ClickTroubleshoot > Advanced >Command Prompt.
Type the following commands and hit Enter to run them one by one:
• cd C:\Program Files
• attrib WindowsApps -h
• rename WindowsApps WindowsApps.old
Reboot your Windows 10, then run System Restore again.
That’s it!
Also read:
- [Updated] Accessible, Quality Sunglasses to Enhance VR Experience for 2024
- [Updated] In 2024, Efficient Techniques for Obtaining iOS Audio Files
- [Updated] In 2024, Pioneering YouTube Visibility Through Strategic Thumbnails
- 4 solution to get rid of pokemon fail to detect location On Nokia G22 | Dr.fone
- A Simplified Guide to JDK Setup for Modern Windows 11 Users
- Fixing Windows 11 Upstart Hiccups: Steps for a Smooth Boot Process
- How to Fix the Error 'Unknown USB Device - Descriptor Request Failed' On Windows: A Step-by-Step Guide
- How to Overcome Window's Update or Installation Glitch: Tips for Resolving Error 0X80070643
- How to Resolve the Persistent Windows Update Issue: Error 8007000E
- In 2024, How to Bypass Google FRP Lock on Vivo Y100 Devices
- In 2024, How To Pause Life360 Location Sharing For Itel P55 5G | Dr.fone
- Install or Upgrade Your Canon PIXMA TS3222 Printer Drivers Now
- Laptop Mouse Malfunctions? Here's How to Restore Functionality and Beat the Lag!
- Overcoming Code 24: Restoring Missing Devices on Your Windows PC
- Quick Solutions for a Seamless Minecraft Adventure: Overcoming Performance Lags
- Shielding Sensitive Information From Customized AI
- Simplify Your Work The Best 5 Mac Snipper Applications for 2024
- System Rests to Cool Down Post-Gaming
- Troubleshooting Tips: Restore Your Lenovo's Laptop Camera Functionality
- Title: Demystifying and Solving the Persistent Black Monitor Issue on Windows 11 Computers
- Author: Anthony
- Created at : 2024-12-17 20:04:49
- Updated at : 2024-12-22 16:43:47
- Link: https://win-howtos.techidaily.com/demystifying-and-solving-the-persistent-black-monitor-issue-on-windows-11-computers/
- License: This work is licensed under CC BY-NC-SA 4.0.