
Deciphering and Resolving Error 0X80070091 for Successful System Restores in Windows 11 - Expert Tips
Deciphering and Resolving Error 0X80070091 for Successful System Restores in Windows 11 - Expert Tips

A lot Windows 10 users reported that system restore did not complete successfully. And the problem pop-uped asError 0x80070091shown as image above. It’s a good thing that Microsoft has noticed this error and will update this thread soon. However, if you are Windows 10 Advanced user, you can fix it right now via the methods below. If you’ve faced it, just go with the easy fixes below.
Disclaimer: This post includes affiliate links
If you click on a link and make a purchase, I may receive a commission at no extra cost to you.
Fix One. Rename the WindowsApps folder in Safe Mode
Boot your Windows 10 into safe mode:
How to:
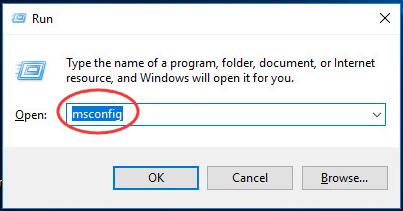
a)
Open run dialog box by pressingWindows key + R key together.
Then type msconfig in the box and hit Enter.
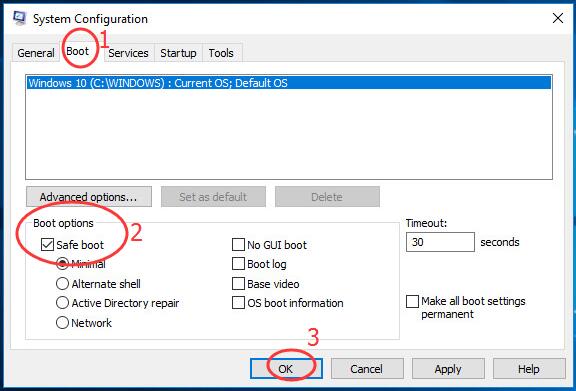
b)
On the pop-up window, view on Boot pane.
Then tick on Safe bootand click OK.
Click Restart, if prompted by system configuration
Then your Windows 10 would get into safe mode.
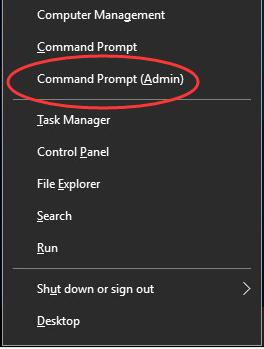
Open quick-access menu by pressing Windows key + X key.
Then click Command Prompt(Admin) to run it as administrator.
When prompted by User Account Control, click Yes.
Type the following commands and hit Enter to run them one by one:
• cd C:\Program Files
• takeown /f WindowsApps /r /d Y
• icacls WindowsApps /grant “%USERDOMAIN%\%USERNAME%”:(F) /t
• attrib WindowsApps -h
• rename WindowsApps WindowsApps.old
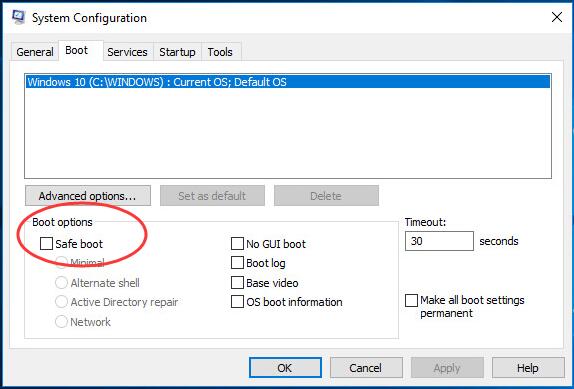
Follows the a) & b) of Step 1 to openSystem ConfigurationWindow.
This time uncheck Safe boot to reboot your Windows 10.
When it finish rebooting, run System Restore again.
Fix Two. Rename the WindowsApps folder in WinRE
Boot your Windows 10 into WinRE(Windows Recovery Environment)
How to:
a)
Open Settings Window by pressing Windows key + I key.
Then click Update & security.
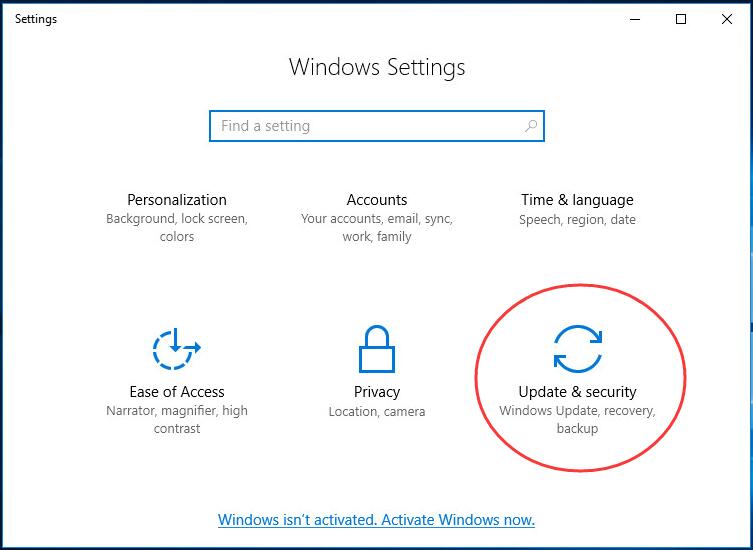
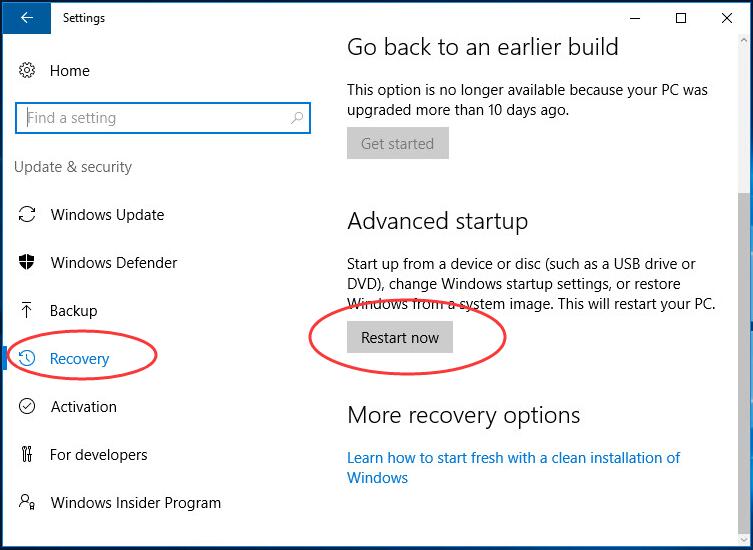
b)
Click Recovery.
Then scroll down on the right side and click Restart now under Advanced startup .
c)
ClickTroubleshoot > Advanced >Command Prompt.
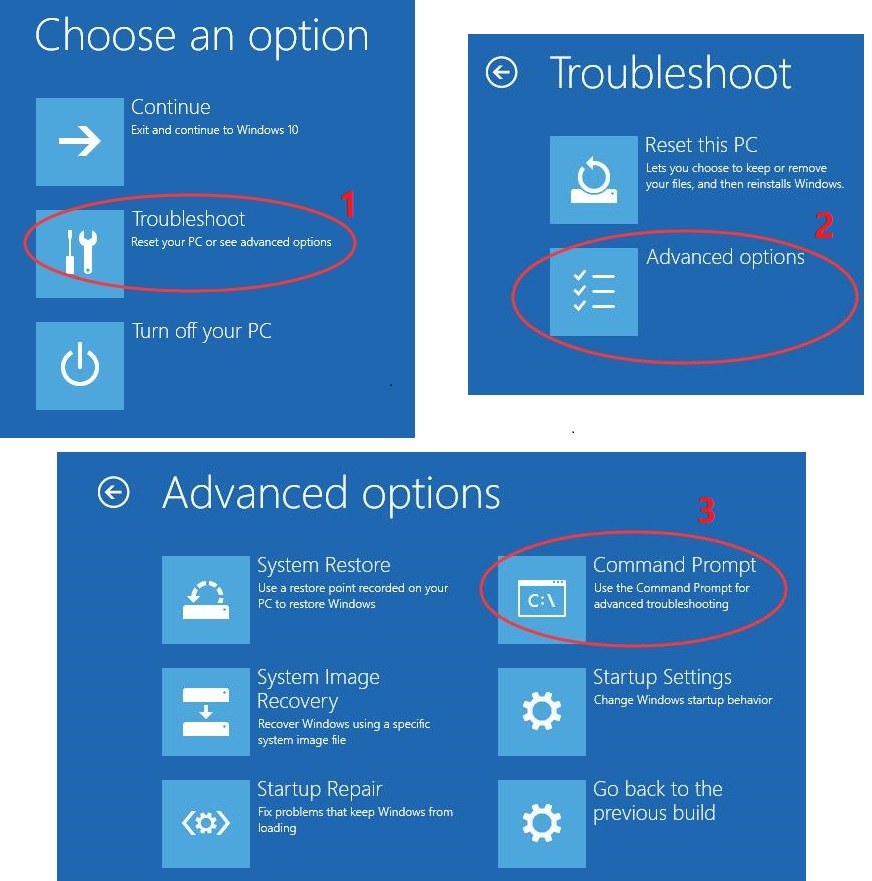
Type the following commands and hit Enter to run them one by one:
• cd C:\Program Files
• attrib WindowsApps -h
• rename WindowsApps WindowsApps.old
Reboot your Windows 10, then run System Restore again.
That’s it!
Also read:
- [New] 2024 Approved Achieve Video Excellence Learn the Studio Editor Way
- [Updated] In 2024, Instagram Excellence Professional Editing Techniques Revealed
- [Updated] Synching Release Timings to Audience Trends
- [Updated] The Ultimate Tutorial for iPhone Voice Memo for 2024
- 1. Solving VLC's Trouble with MKV: A Comprehensive Guide
- 1. Superior WMV Merger: Ultimate Guide to Fusing Various WMV Videos Into a Single File
- 一般的DVDバックアップにおけるエラー解析とトラブルシューティング
- AviUtlでシンプルに動画のカラーコレクト技術
- Complete Tutorial to Use VPNa to Fake GPS Location On Realme V30 | Dr.fone
- DVDデクリプター使用方法|効果的にDVDをコピーするテクニック
- In 2024, Achieve Color Mastery with Canon's Free/Paid LUT Variety
- In 2024, How to Change Netflix Location to Get More Country Version On Vivo V27e | Dr.fone
- Systemprobleme Leicht Aufgeklärt: Computerscan Ergab Keine Wiederherstellungssicherung!
- Ultimate Guide: Making Your Tozo T6 Device Work Seamlessly on Windows nX
- WebM ファイルの AVI/WMV への変換手順ガイド
- Windows PCで楽器の質感を出すためのステレオミキシング技術
- Windows環境でIMGファイルをISO形式に変換する手順
- Title: Deciphering and Resolving Error 0X80070091 for Successful System Restores in Windows 11 - Expert Tips
- Author: Anthony
- Created at : 2025-02-27 19:02:18
- Updated at : 2025-03-05 16:51:10
- Link: https://win-howtos.techidaily.com/1723203183938-deciphering-and-resolving-error-0x80070091-for-successful-system-restores-in-windows-11-expert-tips/
- License: This work is licensed under CC BY-NC-SA 4.0.